Potstickers

Potstickers

With all of my Dads’ family still living in Hawaii, we have spent plenty of time there over the years. I grew up enjoying the unique foods that are available there such as spam, plate lunch, saimin, Maui chips, and shaved ice. My favorite dish that I have learned how to cook is potstickers. I love that once you learn how to make them, you can alter them in any way you wish. They can be filled with savory or sweet items, and the potstickers can be steamed, pan fried, or deep-fried. Think of them as a pizza, where you can add any toppings and in any combination that you like. So here is the basic steamed potsticker recipe. (Steamed and soft potstickers are a great protein source for someone with a lack of ability to chew)

1 package won ton wrappers
1 pound of ground pork
4 green onions (white and green parts chopped)
¼ cup water chestnuts finely chopped (optional)
Small bowl of water

Won ton wrappers are fairly easy to find at most grocery stores. They come in round or square shaped. Try looking in the produce refrigerators or where the packaged tofu is located. Once you buy a package of the wrappers they stay good for a couple weeks so you do not have to use them immediately.

Mix the ground pork, green onions and water chestnuts until just combined. Here is the slightly tricky part, wrapping your potstickers. Using a cutting board or other work surface, lay out several individual won ton wrappers. Place about a spoonful of the pork mixture into the middle of the circle won ton wrapper. Then dip your index finger in the bowl of water and run your damp finger around the edge of the wrapper. Now fold one side over and seal the edges together. You should now have a half moon shaped potsticker. It will be able to stand up on its bottom with the sealed edge pointed up. If the wrapper does not stick together well you can use a little more water. If you are using the square won ton wrappers, arrange your empty wrapper with one corner pointed up and put your spoonful of meat mixture across the middle on the horizon. Run a dampened finger around the edges. Fold the top corner down to meet the corner that is pointed down. Then seal the two sides and curl them inwards. This should end up looking almost like a tortellini shape. Set up a pot with water and a steamer assembly (depending on your steamer container you may want to use a little bit of cooking spray to prevent sticking). Working in batches you want to steam the potstickers for 5 minutes or so, until they are soft and the filling has been steamed. It generally works well to form about 10 potstickers, start them steaming, and then form another set of ten potstickers so you can steam in batches. As you make the potstickers you will also get a feel for exactly how much filling you can put inside without suffering a potsticker blowout during steaming.

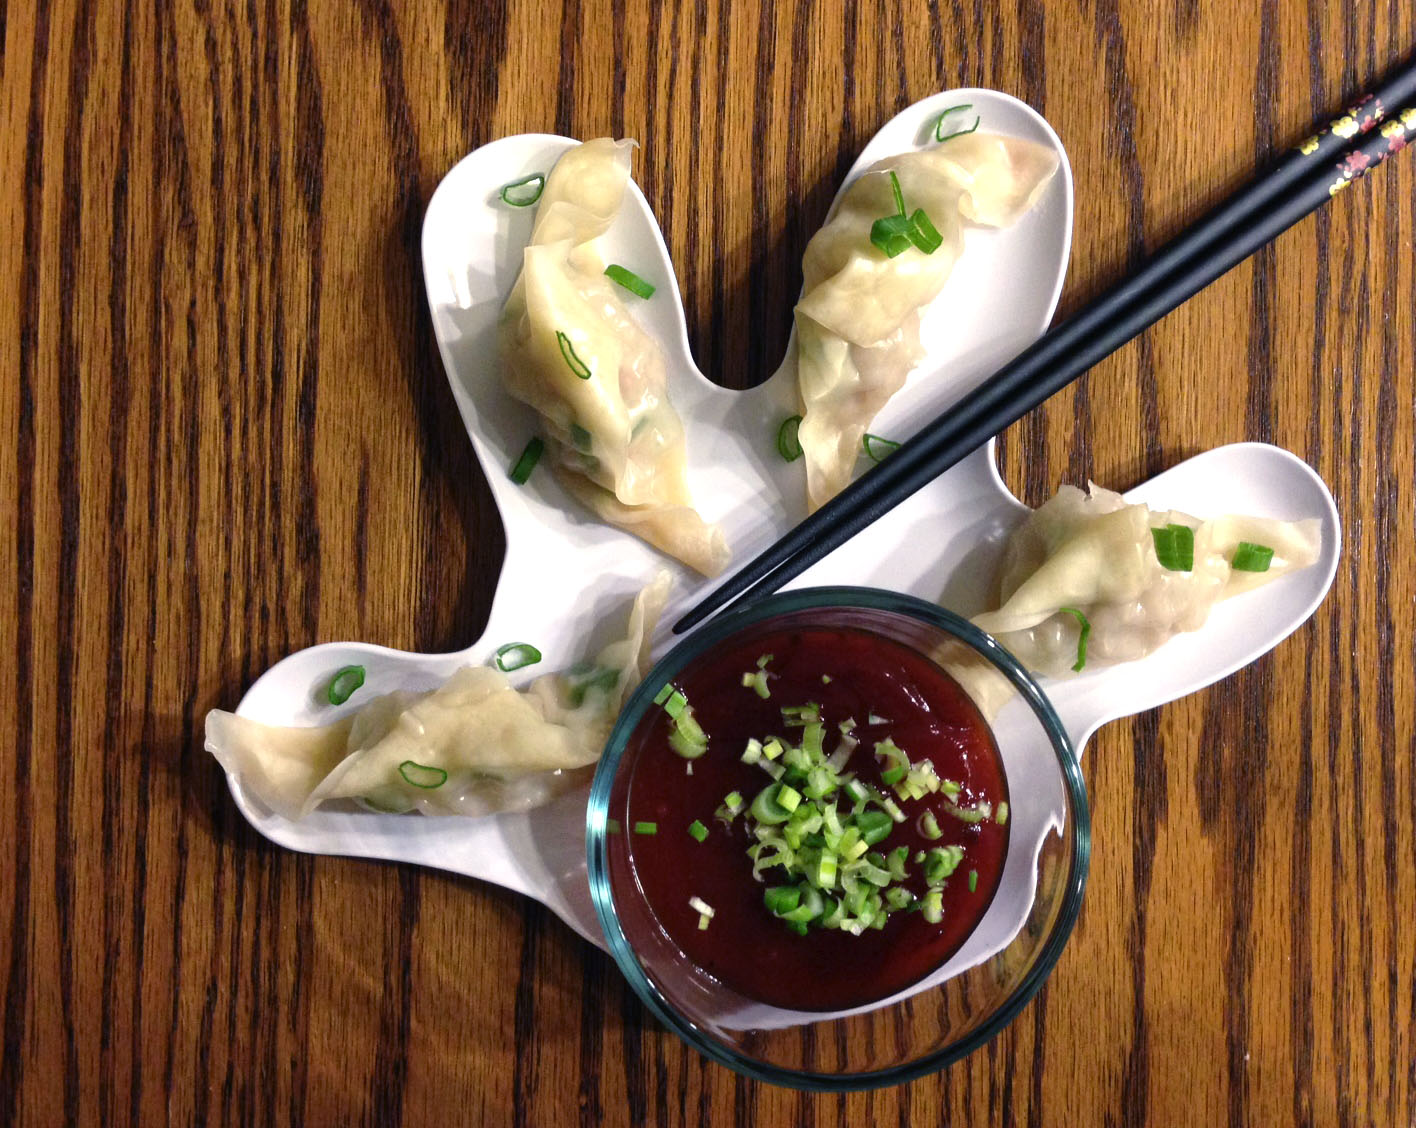
Serve the potstickers warm or at room temperature with a dipping sauce. A simple dipping sauce is soy sauce with chopped green onions (maybe add a little crushed red pepper for kick). Or you can use any store bought sweet and sour, or teriyaki sauce. Sometimes the Asian section of the grocery store will have specific sauces for potstickers. Experiment and find what you like! If you do not have a steamer assembly, you can cook the potstickers in a frying pan just as easily. Put a couple tablespoons of peanut oil (or vegetable oil if you have a nut allergy) in the bottom of a skillet. Cook the potstickers in the oil over medium high heat for about a minute. Then add about a half cup of water into the skillet and immediately put a lid on the skillet (watch out, there is a splatter moment here). Steam the potstickers for about 5 minutes. This cooking method gives a potsticker with some golden crunch on the bottom and a nice and soft steamed exterior. The last option is to toss the potstickers in a deep fryer set at 350 degrees until they float to the top. Remove them to paper towels to absorb the extra oil.

Once you have mastered making the potstickers, the fun of varying the recipe can begin. You can make vegetarian potstickers with a filling of finely shredded cabbage, carrot, onion, water chestnuts and green onion. You can make dessert potstickers by filling the wrapper with apple or cherry pie filling. Feel free to add cinnamon and nutmeg to the dessert versions. The sweat potstickers are very good deep-fried, they are like mini fruit pies. Try dusting them with powdered sugar, yum! For lower calorie potstickers you can substitute ground turkey or chicken in the recipe above. Use ground beef, refried beans and Spanish rice in a filling for a Tex-Mex version that is awesome deep-fried. You can do vegetarian Tex-Mex potstickers with corn, beans, rice and cheese. See what other versions you can think of and feel free to share!!

Toothless_SignatureJaime

Butternut Squash Soup

ButternutSquash

Since I have lost all my teeth, the thing that I am constantly missing in my diet is vegetable nutrition. Veggies tend to be hard to cook in a way that they are tender enough to be gumable but not so dead that you have a veggie paste. So, I have started making lots of pureed vegetable soups to get my veggies.

Here is one of my favorite veggie soups. This butternut squash soup has onions, carrots and butternut squash so it’s an excellent source of veggies. I found this soup recipe on FoodNetwork.com, and then altered it to fit my needs and allergies. I removed the cream and substituted vegetable broth for the chicken stock. So here is my version of this recipe:

2 T butter/margarine
2 T extra virgin olive oil
1 medium onion, chopped
1 large carrot, peeled and chopped
3 cloves garlic, minced
3 ½ pounds butternut squash, peeled, seeded and cut into 1 inch pieces
6 cups vegetable stock
¼ cup chopped fresh sage leaves (or a couple teaspoons of dried crushed sage)
Kosher salt and fresh ground black pepper to taste
Optional: ½ cup dry orzo or other small pasta

In a large soup pot (or I use my enameled dutch oven) combine the butter and olive oil over medium heat. Toss in the onion and carrot and let them sauté (I usually add a little salt here to help the onions sweat out and soften). Once the onions are soft and translucent add the garlic and sauté for another minute or so. Add in the cubed butternut squash along with the vegetable stock. Bring the mixture to a boil and add the sage. Boil the mixture, stirring occasionally for about 20 minutes. Turn off the heat and puree the soup. If you have an immersion blender you can do this step right in the pot. If you don’t have a stick blender (immersion blender) you can always use your normal blender in a couple of batches, just keep a towel over the blender top in case the hot liquid splatters. Return the pureed mixture to the pot over low heat to re-heat the soup. Add salt and pepper to taste. This is where you would also add the pasta if you want, and allow it to cook for another 15 or so minutes until the pasta is tender. I like the way the pasta gives the soup some extra body (and some extra calories). Serve the soup in bowls with a little chopped parsley on the top. Shredded parmesan cheese can be passed at the table if desired.

This is a great vegetarian soup, or it can be vegan if you simply omit the butter or margarine and just use olive oil. We serve this soup with good store bought Italian bread that has been topped with some olive oil, garlic powder and chopped parsley then heated in the oven. I heat my pieces only to get them warm, and allow the rest of the bread to crisp up for my husband who likes the crispy, crusty bread. Enjoy!

Toothless_SignatureJaime

Mac n Cheese

MacNCheese

Mac n Cheese. So I know it’s a staple in many households. It sure was in our house growing up, especially during certain times of the year when Fridays were supposed to be meatless. There are many ways to make this classic dish dairy free (not necessarily calorie free ☺). I am not going to give any recipes for macaroni and cheese. I know everyone has their favorite homemade version and when all else fails there is always a blue box version.

I will use the famous blue box version here. I am sure you could substitute a homemade recipe if you like. For a normal family of four where there is one dairy allergic person this will require about one half a cup of elbow macaroni (or other small pasta, you are just looking for about the same size pasta as that in the box so they all cook together in the same amount of time). We cooked the box pasta with a half cup of small elbow macaroni. After the pasta is cooked and drained we always pulled out one serving of pasta for me (maybe a large serving, because once the rest is cheezed there is no going back). My pasta got margarine to prevent sticking. The rest of the pasta gets made to the blue box directions. This is why we added the extra pasta. I know people like cheese, but if you took out one full serving of pasta and then made the cheese sauce, I hear it is death by cheese powder sauce ☺

As a family we always enjoyed adding other ingredients to mac n cheese. Our favorite was always diced Spam. Please, remember I have Hawaiian roots (and it really is tasty, just think of it as bacon). I love adding some protein to my pasta, and my family usually added the same protein. Spam, bacon, Portuguese sausage, Vienna sausages, hot dogs, pulled pork, mini meatballs, mini pepperoni and bologna are some of the meats I like to use. (My parents like canned tuna in with their mac n cheese, I just can’t do the seafood). Dice them up and toss them in with the warm pasta and margarine or olive oil and it makes a good meal (please be sure you are using fully cooked meats ☺). We have also been known to add some diced veggies to make a more complete meal. Cooked left over broccoli, canned green beans and black olives are my favorites. In our house it is also standard to couple mac n cheese with grilled cheese sandwiches. I love grilled Spam sandwiches and that is an easy substitution for grilled cheese. You can also do grilled bologna, ham or corned beef sandwiches. My sandwich always went in the skillet first (you know those grilled cheeses ooze sometimes). So there is a complete cheesy meal that can be made completely cheeseless! Enjoy!

Side note, I am also allergic to poultry. Spam lite has chicken added to it (that is how they make it ‘lite’). If you are allergic to chicken or poultry, always ask at a restaurant if the spam used is lite or not. We have found it in the weirdest places around Hawaii and I have had to get on the plane headed home, sick from a spam lite experience ☹.

Also for those of you with dental concerns for eating, this is a great toothless meal!! Spam is a nice and soft meat as long as you don’t crisp up the outside edges. Olives are gumable as is the soft pasta. The grilled sandwich is knife and fork friendly as long as you really watch it while its cooking in the skillet. Allow the sandwich to heat up but don’t allow the bread to really gain any color or become too crispy.

Orange Muffins

Orange_Muffins

I was trying to think of what recipe to share on Toothless Wahine first. Then it occurred to me to start at the very beginning (a very good place to start!). Orange muffins have been around our house for as long as I can remember. To be honest I have no idea where we originally found this recipe. These muffins have become a staple at all of our holiday meals as well as anytime we want a fresh baked quick bread with a meal. These are great for breakfast, brunch, lunch and dinner. The batter can be made ahead of time (just add the baking powder when you go to bake them). These muffins can also be made as an orange cake in a square 8×8 glass-baking dish. This recipe is also easy to double or triple if you need more than 12 muffins. You can probably see why this is one of my favorites! And I will give you all sorts of variations to accommodate several food allergies.

Orange Muffins

¼ cup butter/margarine
½ cup sugar
1 egg
¼ cup rice milk/milk/orange juice
½ cup orange juice
1 tsp orange zest
1 ½ cups all purpose flour
2 tsp baking powder

Preheat oven to 425 degrees. Cream butter and sugar together. Add the other ingredients and combine but avoid over mixing. I have made these by hand or in a mixer and I can’t tell a difference. Add the baking powder right before baking. Spoon batter into a 12 count muffin tin that has been lined with paper muffin cups. You can also use cooking spray to line the muffin tins if you wish to not use paper muffin cups, and you can also butter and flour line the muffin tins. Bake at 425 degrees for 10-15 minutes. Muffins should be golden brown on top and a toothpick should come out of the center clean.

So it’s a very simple recipe. I have made these with either butter or margarine so whatever works for you is fine. As far as the liquid is concerned I have used soy milk, rice milk, fresh squeezed OJ and canned OJ. I find the muffins are more orange flavored if you use all orange juice. If you zest a large orange, it is usually pretty easy to get a quarter cup of juice out of the same orange. The muffins do tend to be a little smoother if you use a milk product (I use rice milk regularly). I have even mixed the juice and rice milk half and half and they come out great. Also, if you have an allergy to egg yolks, these muffins do pretty well with two egg whites substituted for the whole egg. For crunchy muffin lovers you can also bake these in a muffin top tin and you get nice muffin tops with crunchy exteriors and fluffy centers (this recipe makes 6 muffin tops). I make them as normal muffins now since I do not enjoy the super crispy exterior since radiation. You could probably also glaze or frost these with an orange glaze or vanilla frosting if you enjoy death by sugar.

I hope you all find this recipe as useful as I have. Its one of my favorites and ono! (yummy in Hawaiian). Have I mentioned that I have family history in Hawaii so I tend to use Hawaiian words at random? ☺