Dairy-Free Lasagna

Lasagna

Dairy Free lasagna

1 lb ground beef
2 24oz jar bolognese sauce (or your favorite spaghetti sauce)
1 12oz box of no-boil lasagna noodles
Besciamell sauce (recipe follows)
3/4 cup grated Parmesan cheese (optional or for those without a dairy allergy)
Butter or non-dairy margarine to grease the lasagna pan

Dairy free Besciamell Sauce:

1/2 cup butter or non-dairy margarine
1/2 cup all purpose flour
4 1/2 cups unflavored coconut milk
A couple grates of fresh nutmeg
Salt and pepper to taste

Brown ground beef and crumble. Drain. Add in spaghetti sauce and heat through with ground beef. Meanwhile make white sauce by melting the butter in a medium pan. When melted stir in the flour and cook for a few minutes without letting the flour brown. Warm the milk in the microwave. Whisking constantly, slowly add the warmed coconut milk to the butter and flour mixture. Slowly bring the mixture to a boil. Reduce the heat and simmer for 15 minutes. Turn off the heat and season the sauce with ground nutmeg, salt and pepper. Allow both red sauce and white sauce to cool slightly.

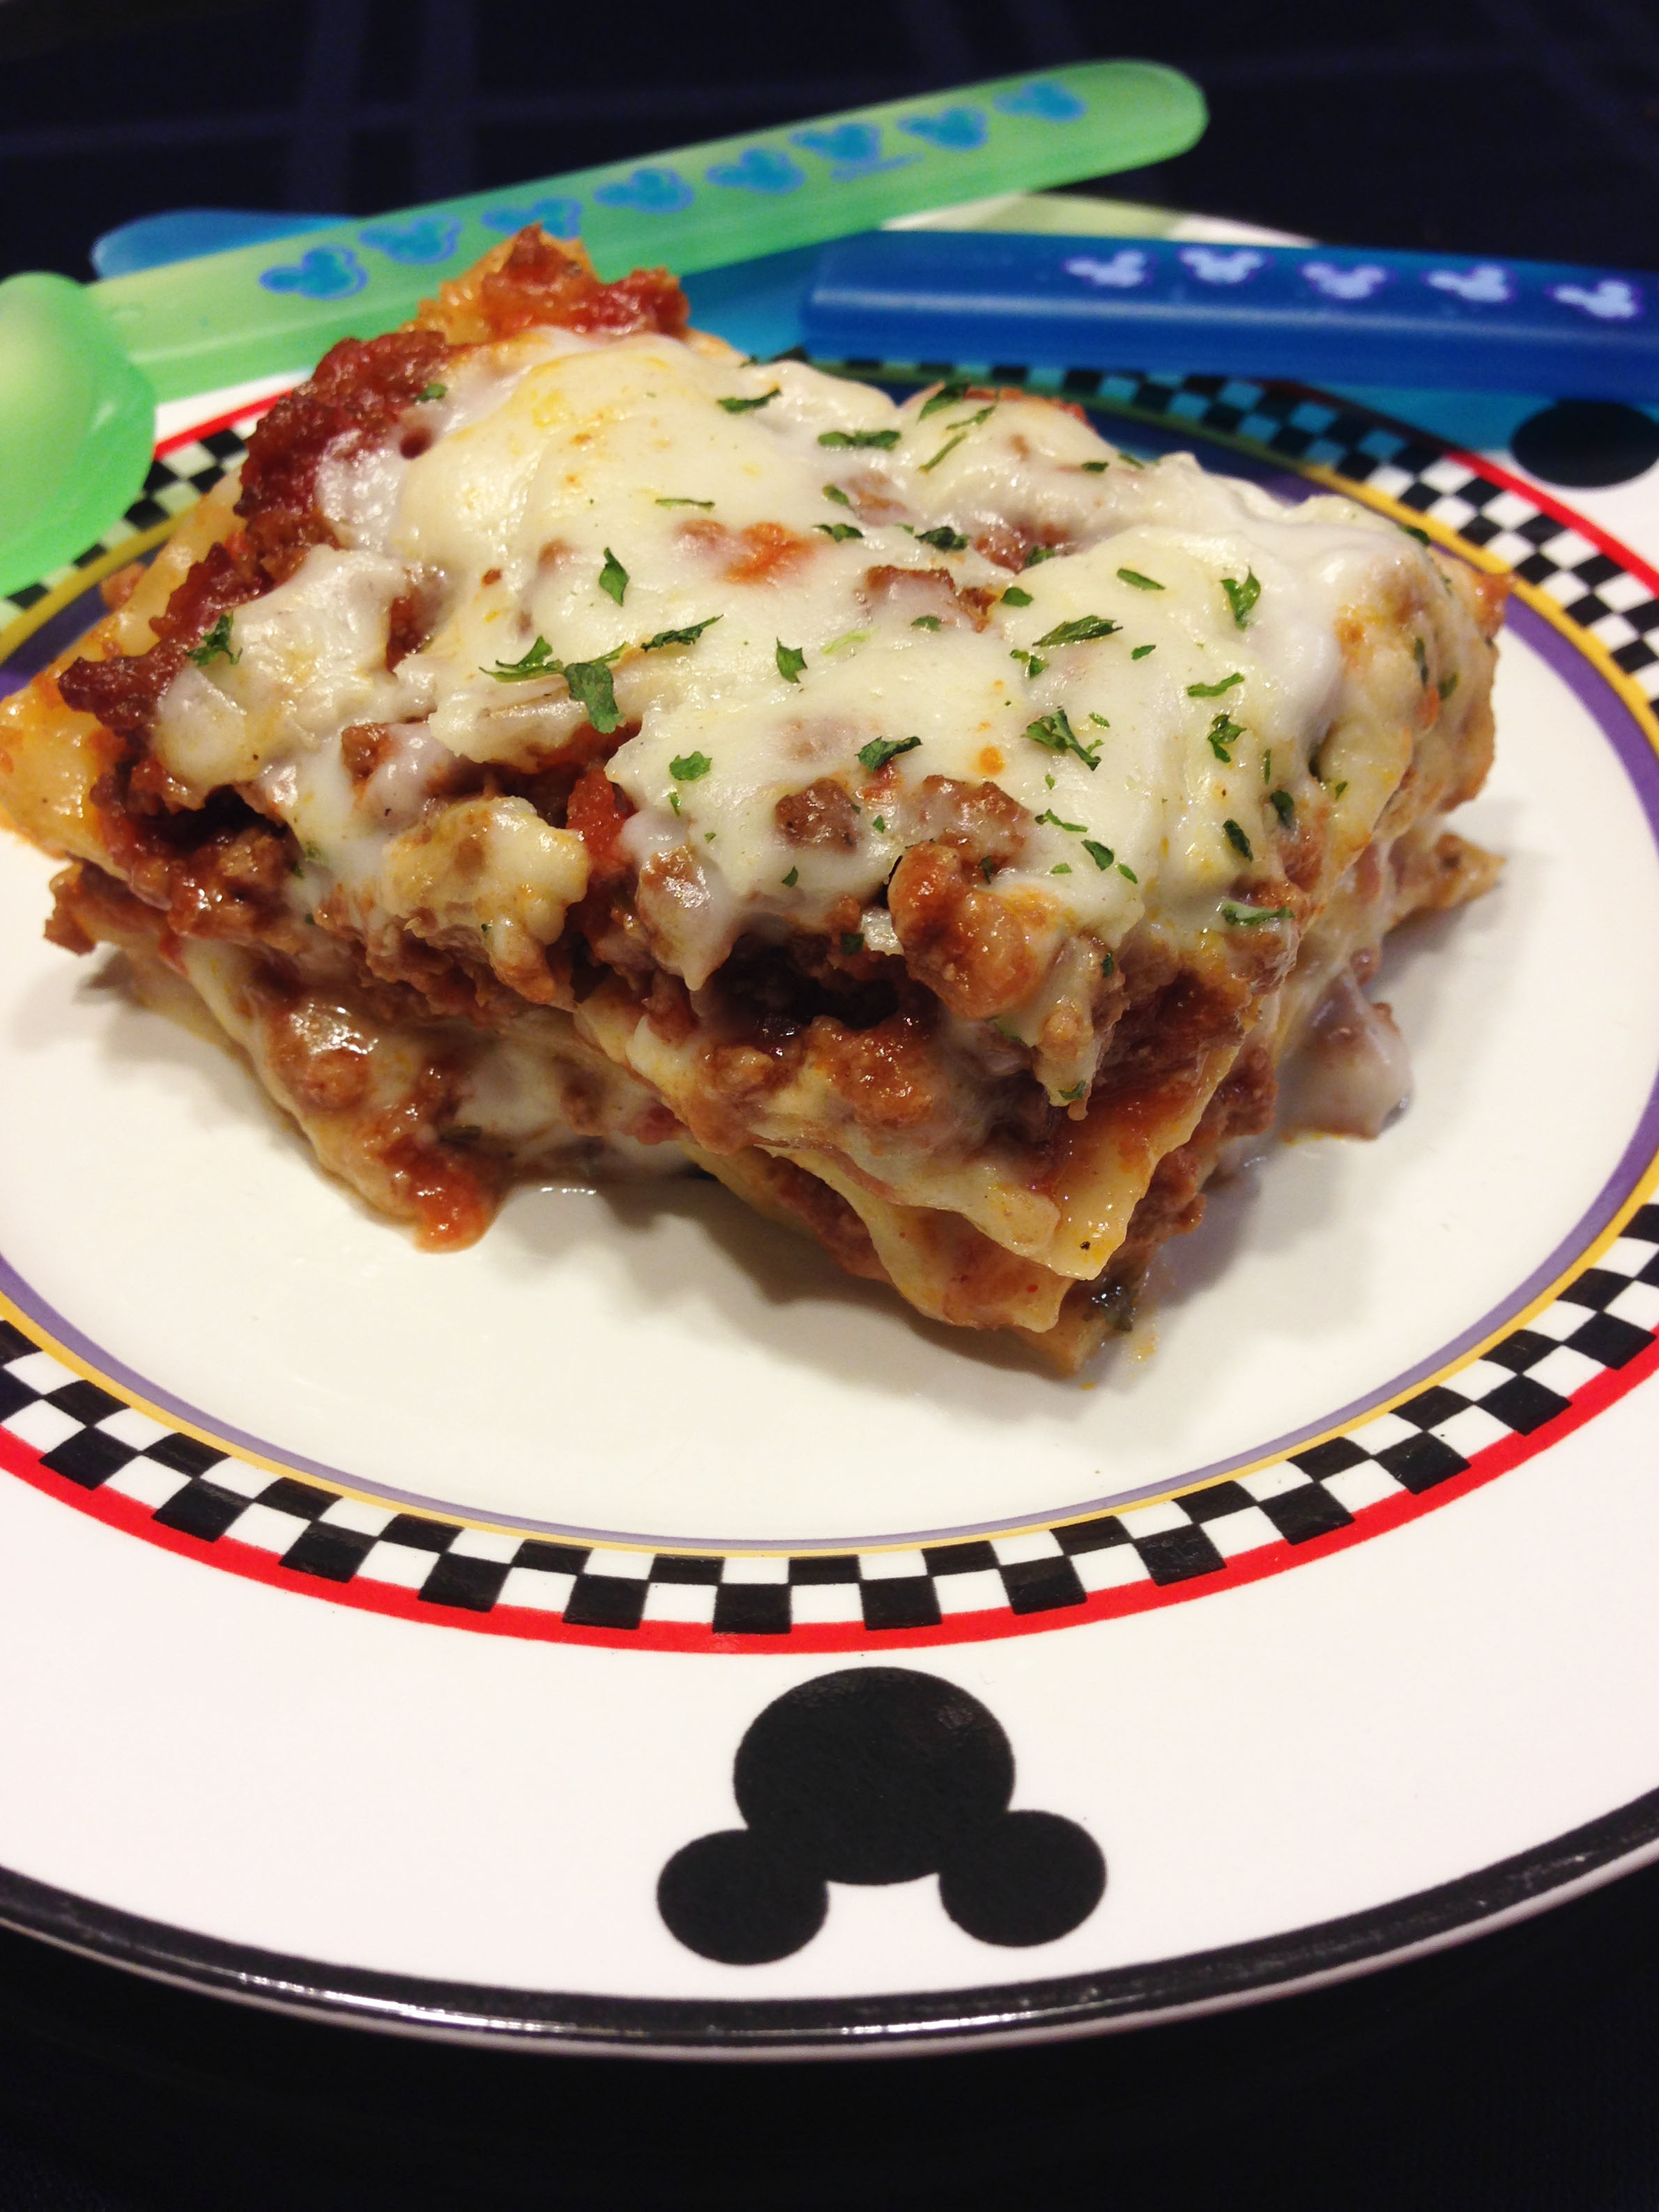
Grease your lasagna pan. Just a note, I made two separate smaller lasagnas, one that was dairy free for me, and one with parmesan cheese in it for my husband. Preheat the oven to 375. Cover the bottom of the pan with a thin layer of Bolognese sauce. Then a layer of noodles. Then more Bolognese and a thin coat of besciamell sauce. Note: If you are using the parmesan cheese, sprinkle some cheese on top of the white sauce, if you are staying dairy free, skip the parmesan. Continue the layering ending with a hearty layer of the besciamell sauce on top. Make sure all of your noodles are covered in sauce so they cook evenly. Bake for about 30 minutes. If you wish you can do the last 5 minutes of cooking time under the broiler if you desire a little bit of crisp on the top of your lasagna. I sprinkled some dried parsley on top for a little color before serving. Lasagna may certainly be served with parmesan on top of individual servings for the cheese lovers in the house.

This whole adventure started when I saw a cooking channel episode where they made a lasagna without layers of ricotta and other cheeses. I was intrigued by the fairly dairy free lasagna recipe. I tried the white sauce using coconut milk and it came out fine so I decided to try the whole experiment. I made one lasagna with the gated parmesan in all of the layers for my husband. He had trouble telling the difference between the taste of his and my dairy free version. In the future I will just make one lasagna with no dairy and let him parmesan his serving if he desires. I had also bought the pre-cook lasagna noodles (I had no idea there were two kinds of noodles), so my version took boiling noodles also. I am also pretty sure that you could use any homemade bolognese sauce you like. It just depends on how much time you have. I have not tried freezing this lasagna before baking yet, but that will be my goal next time I try this adventure. I would love if I could make two or three small lasagnas at a time and freeze two. With only two of us in the house, we don’t need leftovers for weeks!

Toothless_SignatureJaime

Dairy-Free Coconut Orange French Toast

Coconut_Orange_FT

Dairy Free Coconut Orange French Toast

There are just those days when I really seem to want breakfast. I tend to not be a breakfast eater normally, but there are those weekend days when there is just nothing better than a good meal. This past weekend was one of those days where we had a long day planned, so we started the day with a yummy plate of French toast.

Of course with a dairy allergy there had to be a milk substitute involved. Following along with my new love for coconut milk, this was my choice. Now I know everybody has their own favorite way to make French toast, whether its with fruit or filled or crusted with cereal. One of my favorites has always been with some orange zest in it. I like the cleaner, less heavy taste of French toast with a little citrus. So I combined orange and coconut and it was super good, so now I have a new variation for weekend breakfast.

Coconut Orange French Toast

3 whole eggs
¼ cup vanilla coconut milk
1 tsp vanilla extract
2 tbsp coconut flavored sugar (or plain sugar)
zest of one whole orange (1-2 tsp)
1 tsp of fresh orange juice
8 slices of bread (I used sliced potato bread)

Butter, margarine or veggie oil for the skillet.

Combine all the ingredients in a shallow dish. Whisk briskly to be sure all of the egg is mixed in well. Heat a skillet or griddle on medium heat with butter or oil. When warm, dunk your bread of choice in the egg mixture then flip to coat both sides. Grill the toast on one side for a few minutes until a nice golden crust is formed. Flip the toast and grill on the second side until the same color is reached. Work in batches to dunk and then grill toast until you have used all the batter. I made 8 slices of French toast with this amount of batter. I serve the French toast with sliced oranges (convenient way to use the zested orange) and maple or coconut syrup. I have coconut pancake syrup that is good (but sweet) with this French toast. The coconut flavored sugar that I used here is a product I get in Hawaii, but plain granulated sugar would work as well. In the past, I have also sprinkled this French toast with shaved coconut. This recipe has a very subtle coconut flavor but the lovely orange flavor is certainly dominant. And you can’t beat a great breakfast in 15 minutes!

Dairy-Free Coconut Pudding

Coconut_Pudding

So it would appear that I have been away from Toothless Wahine for quite some time. After a busy fall and a cold winter I am finally back to doing some new experiments in cooking. We also have a new piece of hardware that has been added to our cooking equipment. This fall my husband and I joined the ranks of backyard BBQ enthusiasts when we bought our very own smoker. It has been a struggle to use the smoker when it’s been so cold and snowy but I will certainly have some smoker blogs coming up soon. For now, I want to start sharing my new obsession in life : coconut milk.

As I am allergic to milk substitutes like soy or almond and cashew milk I have always struggled a little bit with the remaining choices: oat, rice and coconut. Oat milk has a very mild flavor and is good in cereal, however, we have never loved it in mashed potatoes or other creamy dishes. My husband is not a huge milk fan but he is vocal about if things like mashed potatoes are creamy enough. On a side note Sprouts and Whole foods stores here have single serving (8oz) cartons of oat milk which is nice when I don’t want to open a whole quart container as I often don’t use the whole container before it goes bad. My go to milk until recently has been rice milk. Again, it has a very neutral flavor and does not tend to leave an after taste likes lots of other milk substitutes can. It can also be found in juice box sized boxes at several health food stores. Rice is incredibly allergy friendly so places that are looking for an extremely allergy friendly milk alternative seem to favor rice milk. FYI most of the Disney parks and the Disney cruise ships carry rice dream products, you just have to ask! So, while rice milk works well, it is very thin and not fatty, so it does not pass my husbands creaminess test.

I don’t know why I have stayed away from coconut milk for so long. I like the flavor of coconut in small amounts but I am certainly not going to drink a glass of coconut milk or eat a handful of coconut flakes. There has also been a concern in the back of my mind that coconut milk would make any savory dish have too much of a sweet coconut flavor. Boy was I wrong. Coconut milk seems to give a mild sweetness to savory dishes, but that’s about it. The fat content helps make things creamy (yes it passes my husbands’ mashed potato test). It also really does not taste like coconut. Most of the other folks I have used coconut milk with can’t even tell I used it. It certainly worked for our Thanksgiving meal this year. The kiddos present all gobbled mashed potatoes with no complaints! So prepare for some more blogs with coconut in them, and maybe even some remakes of some of my older blog recipes. For today I want to share a very simple coconut milk substitution that turned out to be super yummy!

Dairy free pudding dessert tarts
1 box coconut cream cook and serve pudding mix 2 cups coconut milk
2 graham crackers, crushed
1 handful of sweetened coconut flakes, toasted

I made the pudding by following the cooking directions on the box. Then I put the pudding in four ramikens to make four 1/2 cup servings. I then let the pudding chill in the fridge covered to keep it from hardening on top. After dinner I simply crushed the graham crackers and sprinkled them on top of the pudding. Then I sprinkled the toasted coconut on top. (To toast the coconut I just put it in a small skillet over a low flame and tossed it frequently until it smelled toasty and was lightly browned). So simple, so yummy, and so many ways to vary this idea in the future. I have since made the same pudding and spooned it into mini graham cracker dessert crusts and then topped it with the toasted coconut. I’m excited to try other flavors of pudding in the future!

Cauliflower Soup

Cauliflower_Bowl

So now that the weather is warming up (slowly, ever so slowly) I am looking for veggie soup recipes that are good weather served warm or cold. I am a huge fan of cauliflower, especially with my limited chewing abilities. It cooks down be nice and tender so I am a fan. The addition of bacon and onion makes it even better! Plus I blend this soup so it is smooth and easy to eat. This soup has become my favorite way to get my bacon fix!

Warm (or cold) Cauliflower soup
3 Tbsp unsalted butter or margarine
2 ribs celery, chopped
2 leeks, ends trimmed, chopped and soaked to clean any dirt
4-5 slices of bacon, chopped
2 cloves garlic, chopped
4 cups vegetable stock (1 box works well)
1 Tbsp chopped fresh thyme leaves (or 1 tsp dried thyme)
1 large head of cauliflower cut into 1-inch pieces
Kosher salt and fresh ground black pepper

Cauliflower_Simmer

Melt the butter in a pot over medium-low heat and add the chopped leeks and celery. (I skip the celery) I toss in a pinch of salt to help the leeks to sweat out a bit. After about 5 minutes I toss in the chopped bacon to start cooking. After 5 minutes add in the garlic and stir. When the garlic is fragrant add in the vegetable stock, thyme and the cauliflower. Season with salt and pepper to taste. Simmer for 20-30 minutes until cauliflower is soft. Blend with an immersion blender in the pot (or in two batches in a blender). Check seasoning again and enjoy! You can also refrigerate and serve chilled.

This soup is great when served with crisp bacon pieces or cauliflower florets or even croutons or saltine crackers. I have made this soup with shallots or even sweet onions, depending on what is in my fridge. I also have to admit that I have been known to use extra bacon in this soup. I really miss being able to chew bacon, so this blended soup is a great way for me to get a bacon fix!

Toothless_SignatureJaime

Ham-Bone Minestrone Soup

MinestronePhoto

As we now find ourselves in the cold January months (especially with all the severe cold that is courtesy of the polar vortex) I find I am looking for soup recipes often. This is one that I got from a family member that is awesome! It takes some time, but it’s super easy to make. Most of the ingredients in this soup are dry, so it also makes a great dry soup mix that I have used a gifts a bunch this winter. I can keep all these dry ingredients in the pantry and I just have to add a few vegetables and I magically have soup. This is souper easy and tasty for a hearty complete meal!

Recipe:

One ham bone or ham shank for broth (optional, use it if you have one, the soup is good without it to!)

1 cup finely minced celery
1 cup finely minced onion
1 cup finely minced carrot
¼ cup butter
½ cup dry garbanzo beans
½ cup dry small kidney beans
½ cup dry navy beans
½ cup dry peas
¾ cup sliced carrots
¾ cup chopped onion
¾ cup sliced celery
½ cup rice
½ cup pearl barley
1 tsp dried parsley
1 tsp dried oregano
1 tsp dried basil
2 tsp soy sauce
1 cup small shell macaroni
Salt and pepper to taste
Serve with parmesan cheese

Saute minced onion, celery and carrots in butter until brown. Add dried peas and beans and 3 quarts of water to pot. Add home bone here if using. Cook slowly until beans are almost done, 2-2 1/2 hours. (garbanzo beans take the longest) Add the remaining vegetables, rice, barely, and seasonings plus soy sauce. Season with salt and pepper if desired. Cook for about another hour. In the last 20 minutes add the shell pasta and more water if the soup needs more broth. Serve with parmesan cheese and bread for a great hot dinner for a cold night!

I have found that I start the garbonzo beans first, as they take the longest to soften up. I also tend to cook the beans for some extra time so they are very soft and will melt in my mouth. This soup is great whether you have a ham bone, a ham hock, or if you make it vegetarian. Next time there is a cold and snowy night, try out this soup recipe!

Toothless_SignatureJaime

Non-Dairy Scalloped Potatoes

Scalloped_Potatoes

I am always looking for new recipes that are easy to make for dinner. With my chewing limitations and food allergies dinner can get very repetitive. I spend lots of time looking at recipes online to find new options that are allergy friendly. I came across this scalloped potato recipe and was excited to see that there was no cream or cheese in it. There is milk in it, but I have made this with rice milk or with vegetable stock and it always tastes good. With how sensitive my mouth can still be, I also like how mild this recipe can be. The seasonings here are very mild. My husband likes to add more spice and more paprika to this. I am sure you could also add chili flakes or other spice to this if you desire a zestier side dish. It is also nice to have a side dish that can be cooked in the over next to a meatloaf. Makes for a one-oven dinner!

Kentucky Scalloped Potatoes (Recipe found on foodnetwork.com)

4-5 large potatoes
¼ lb butter
salt and pepper to taste
1 sweet onion sliced thin (I toss it in the food processor)
1 Tbsp fresh parsley (dried works also)
¼ tsp paprika
2 Tbsp bread crumbs tossed in melted butter (optional)
2-3 cups hot milk or milk substitute (I use rice milk)

Peel and thinly slice the potatoes (a mandolin helps). Grease a glass or pyrex casserole dish. Spread a layer of potatoes evenly on the bottom. Follow by some sprinkled onion, salt, pepper and sprinkle with a little flour. Continue layering the potatoes with onion and seasoning in between. After the last layer of potatoes pour the hot milk over the dish. Use enough liquid to cover up to the top layer of potatoes. On top sprinkle a little parsley along with the paprika for color. Sprinkle the breadcrumbs on the very top. Bake the dish for an hour at 350 degrees or until the potatoes are tender. At our altitude here it takes a little longer or a 375 degree oven. (Be sure there is at least an inch of clearance in the top of the dish so it does not boil over in the oven)

The nice thing about this dish is that you can alter the oven time depending on what other dishes you have in the oven. Any temperature from 350-400ish works, just adjust your time. If desired, you can add shredded cheese on top, for cheese lovers!

Toothless_Signature

Teriyaki Meatloaf

Teri_Meatloaf

Since I have become toothless I have discovered that recipes with ground meats are by far the easiest for me to eat. Meatloaf is an easy thing example of this. I have discovered several recipes that I like, but most have a tomato based sauce. Some days acidic tomato products just hurt my sore mouth and throat (after effects of radiation), so sometimes a tomato free, and sweetened Asian version is a good alternative. I also love that this recipe uses a pre-made teriyaki sauce so it is very easy! This recipe tends to be very moist and not as firm as a traditional meatloaf (which I love because it is easy to eat, my husband is not such a fan because he likes a more toothsome meatloaf, go figure). I will say that you can also alter some of the liquid levels in this meatloaf if you want a more-firm finished product.

Teriyaki Meatloaf

1/2 cup dried bread crumbs
¾ cup rice milk
2 eggs
1 tsp minced garlic
1/3 cup Yoshida’s teriyaki sauce (plus extra to drizzle on top)
1 small onion diced (or chopped in the food processor)
2 lbs ground beef
Chopped green onion for garnish
Soak the breadcrumbs in the milk. Lightly beat the eggs together. Combine all ingredients except for green onions. Mix the meatloaf, being careful not to over-mix the ingredients. Bake for one hour at 350 degrees or until the beef is fully cooked. Serve with chopped green onions and a drizzle of teriyaki sauce. I love this one with sticky rice with extra teriyaki sauce on the side. Enjoy!!

Toothless_Signature

Dairy-Free French Toast

French_Toast

My husband and I are huge fans of fresh French bread for dinner. It is great with a little butter or dipped in olive oil and herbs. Any meals that have soups, stews or sauces are always great when accompanied by fresh crusty French bread. And I can buy it fresh at the store anytime I need to pick up a few groceries. My husband likes the crusty edges and me the toothless one likes the soft interior parts. So we make a good team. However, we only get through, at best, half of the loaf of bread. Then we always have half a loaf of leftover French bread, day old and no longer crusty on the outside. And we never know what to do with the leftovers. I usually end up taking the (now hard) leftovers and making breadcrumbs out of it. A good use, but I’m always looking for a better use for the leftover bread. When I have time the next morning to make breakfast, I can use my leftovers, and make a super yummy breakfast as well. French toast with my leftover French bread is awesome, and I have a great recipe that makes it allergy friendly and it can be soft and easy to eat for the toothless eater. Add some fresh fruit , eggs and sausage and you have a great Sunday brunch!

French Bread Dairy Free French Toast

6 Eggs
1 ½ cups rice milk (Soy milk also works)
1 tsp grated orange zest
½ tsp pure vanilla extract
1 good squeeze from a honey bear
A dash of kosher salt
½ loaf of leftover French Bread (Or other crusty bread leftovers)
Unsalted butter or margarine
Vegetable oil

Optional for Serving:
Fresh chopped fruit (or frozen fruit) with a little added sugar
Good preserves with lots of chunks
Powdered sugar

Begin by beating the eggs in a shallow bowl. I love my rectangular pyrex baking dish for this. Then add the rice milk, orange zest, vanilla, honey and salt. Wisk the batter until well combined. Slice the bread into ¾ inch think slices. Soak the bread in the batter for several seconds or on each side. I make sure I also get all of the crusts coated. Heat a large skillet over medium heat with a mixture of butter/margarine and vegetable or canola oil just to coat the bottom. Fry the soaked bread several pieces at a time until golden brown on the first side, 3-4 minutes. Flip the bread a fry 3-4 more minutes. French toast can be kept warm in a 250 degree oven until its time to eat. Serve the French toast with different fruits and syrups. I like to use my griddle for the toast, since I can cook most of the slices at one time with the griddle (plus the griddle is the way to go for a brunch party).

This is a very basic recipe that is easy to make alterations and substitutions with. I love a citrus version with lemon and orange zest as well as orange juice substituted for ¼ cup of the milk. This can be served with mandarin oranges and is a summery version. My favorite is to chop fresh strawberries and macerate them in a little sugar and top the French toast with powdered sugar and the strawberries. This dish is easy to alter for other food allergies with various milk substitutes and the bread can be switched out for a gluten friendly bread. You could even top the toast with coconut whipped cream and coconut shreds. Have fun trying different toppings until you find one you like!

Toothless_SignatureJaime

Garlic Grilled Lamb Chops

LambChop

So we are now at the height of BBQ season here in Colorado. Unfortunately, that can mean that any time you intend to bbq, the weather may completely disagree with you. I have ribs in my fridge that have been marinating for four days, and we keep getting afternoon wind and thunderstorms that prevent firing up the grill ☹ I do enjoy bbq meat recipes that allow for some wiggle room in the time the meat can stay in a marinade. One of my favorite summer treats are thick cut lamb chops on the grill. Cosco seems to always have nice 2-inch thick lamb chops this time of year. I have an awesome marinade for the lamb chops, and it seems to be OK if the lamb is in the marinade for a few hours, or a couple of days which always helps here with crazy weather. The lamb chops are also easy to cook to several different temperatures on the grill. I can cook them on low heat, without getting a sear on them for me the toothless one. I can cook them with a nice sear and great grill marks at a higher temperature for others. These are great for dinner parties!

Garlic Marinated Lamb Chops

12 lamb loin chops
¼ cup Dijon mustard
1/3 cup minced garlic
¼ cup soy sauce (I use low sodium)
1/3 cup canola oil
½ cup red wine (which can also be served with the meal if you like wine)
1 tsp ground pepper

I use a gallon ziplock bag to mix the marinade. Once I add the lamb chops I tend to put it in the fridge in a bowl just to prevent any unfortunate leaks. I buy lamb chops in groups of eight and this amount of marinade works well. I tend to add a little more of the mustard and I often use honey Dijon mustard. If you are not a fan of soy sauce (or sensitive to too much soy) you can just add about a teaspoon of salt and skip the soy sauce. These are always great when served with grilled garlic red potatoes and fresh corn on the cob which can be grilled right in the husks. I so love summer menus that can be completely cooked on the grill so there is no mess or extra heat in my kitchen!

Toothless_SignatureJaime

Berry Trifle

Berry_Trifle

So it’s 4th of July week and probably the biggest BBQ holiday of the year. For me there is always the challenge of finding a dessert that I can eat, but that is yummy and travels easily. It also happens that fresh berries end up being on sale the week of Independence Day. So this week I made my favorite dessert to take to parties, a berry trifle.

With all of my food allergies I have always loved angel food cake. It is almost always dairy free and easy to find at grocery stores. Add some fruit and maybe some sorbet or vanilla rice dream and you have an easy strawberry shortcake. With the addition of blueberries you have a very patriotic version. Several years ago I was given a trifle bowl, which makes this dessert look stunning when made for a large group. So here is my all store-bought recipe for an easy fourth of July fruit and cake trifle:

1 2lb package of fresh strawberries
2 pints of fresh blueberries
2 packages (24 count or so) lady fingers
2 tubs (14 oz) strawberry pie glaze (often found in the produce department)
1 32oz container of marshmallow cream

I start by washing the fruit and I set aside a few pretty strawberries and a handful of blueberries for the topping. I then chop the strawberries into small pieces. And then I’m ready to start layering in the trifle bowl. The bottom layer is lady fingers, trying to cover the bottom of the bowl as completely and evenly as possible. This is followed with a layer of strawberries with pie glaze on top, then a layer of marshmallow cream. Here you can repeat the layers if you are making a strawberry only trifle. For the holiday I added a couple layers of blueberries into the mix for the color. Continue layering the ingredients being sure to end the top layer with a generous amount of cream. I then use the reserved whole berries, blueberries and a few lady fingers to decorate the top. This whole dessert can be made in about 15 minutes and all of the ingredients may be store bought making this a very simple dessert.

I have made many different versions of this dessert, and I am sure there are tons of substitutions or variations that would also be delicious. I have used kiwis, blueberries, strawberries and peaches for the fruit layers. For the lady fingers, one could use any pre-made angel food cake or even a chocolate angel food if desired. I have also made this with a vanilla pound cake (when I can find a dairy free version at the store or I can make it myself). As for the marshmallow cream, it is a little sweet for some tastes but it is a good dairy free option (if a little hard to spread into even layers). There are plenty of dairy free whipped topping recipes that use full fat coconut milk and the slight coconut flavor is good with the strawberries. There is also soy whipped topping at some stores but I have not tried it. Of course you could make this with normal whipped cream if dairy is not a concern. These are just the variations I have tried. Have fun experimenting with this one, and happy July 4th!!

Toothless_Signature