Protein for Breakfast

Protein_Breakfast

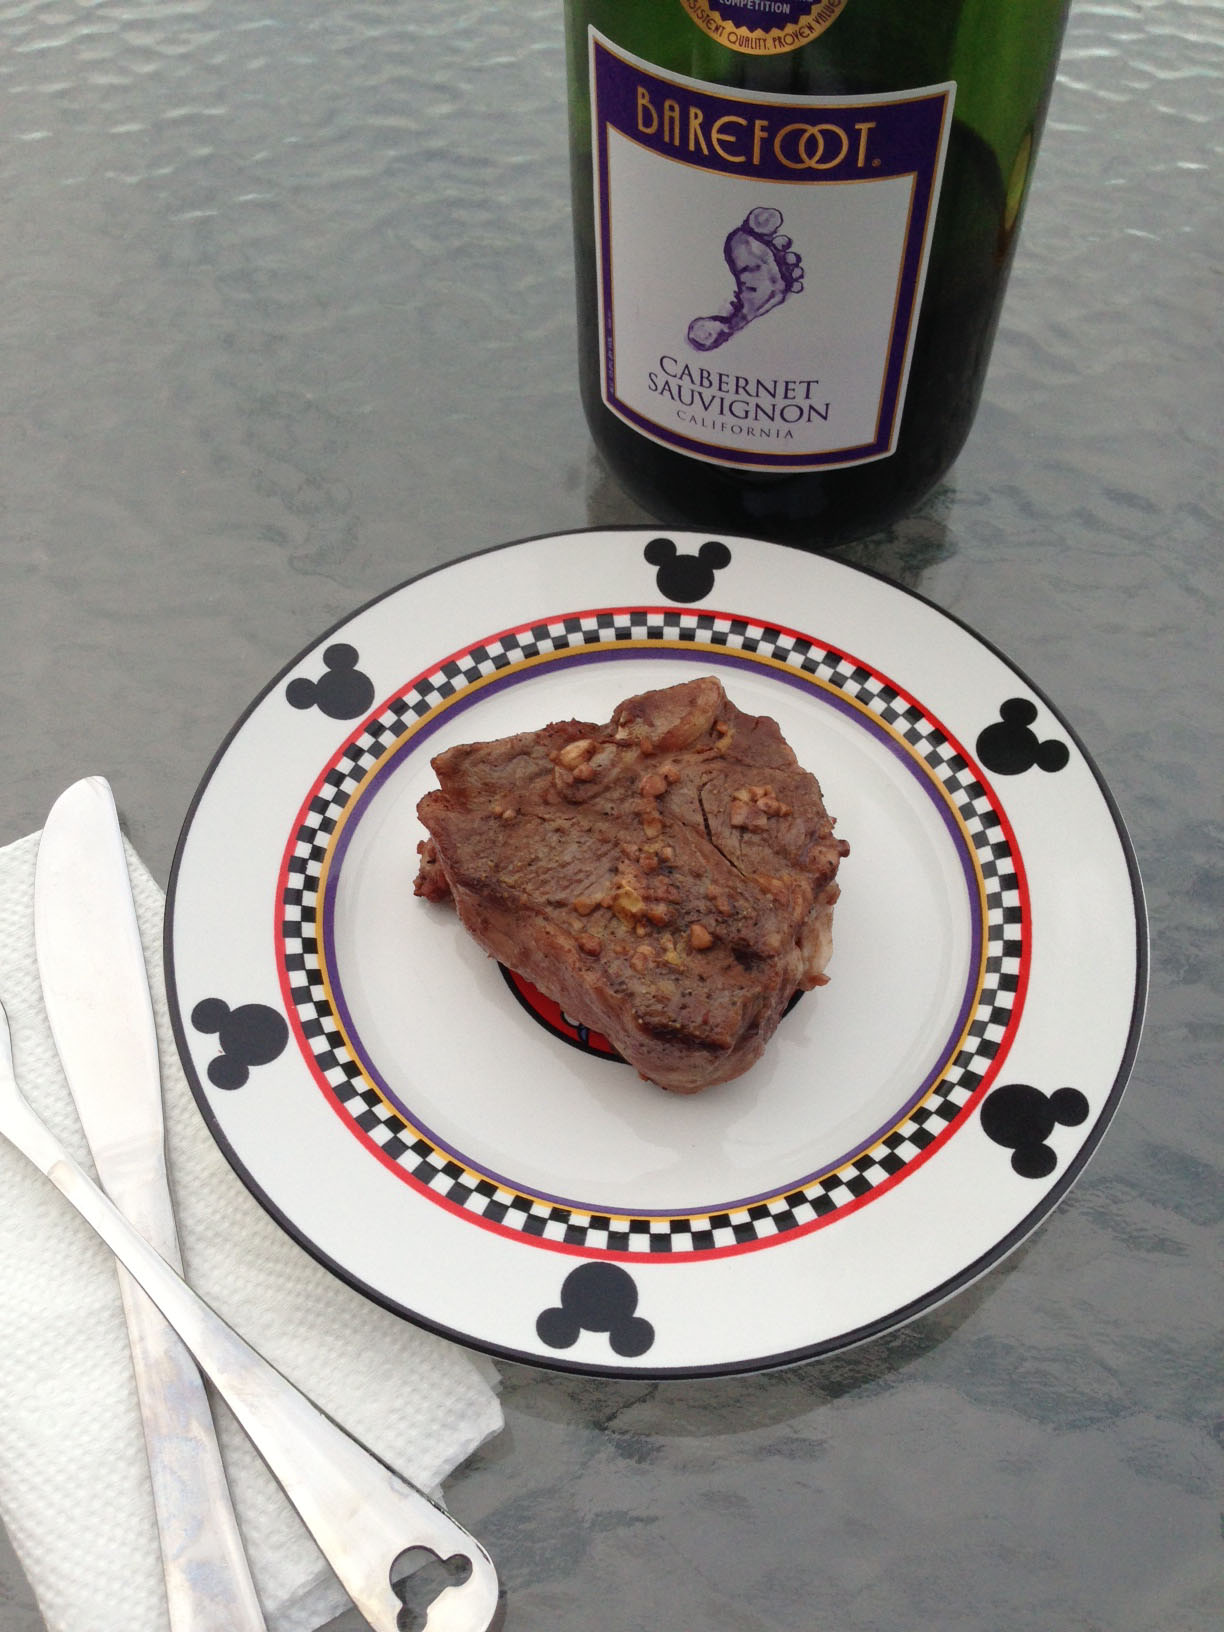
Living without teeth, but with lots of food allergies has proven to be an interesting challenge. Carbohydrates such as potatoes, rice and pastas are fairly easy to cook in a method that leaves them soft and gumable. Vegetables can be steamed or cooked in various methods that leave them fairly soft and squishy. The most difficult thing to get large amounts of (for me) seems to be proteins. There is no easy solution like drinking protein beverages like Ensure. They all seem to be based off of milk protein, whey protein or nut proteins, all of which I am allergic to. Milk substitutes with protein also are limited to soy or nuts, again causing allergy conflicts. Cooked proteins like steaks, pork or grilled items are too hard of a texture to eat without help from a knife, blender or food processor. And the next doctor who tells me I just need to drink Ensure, will end up wearing one, grrr, because I hear that all the time. So I have struggled to find ways to get my protein, especially in the mornings, so I can start off the day with a good meal.

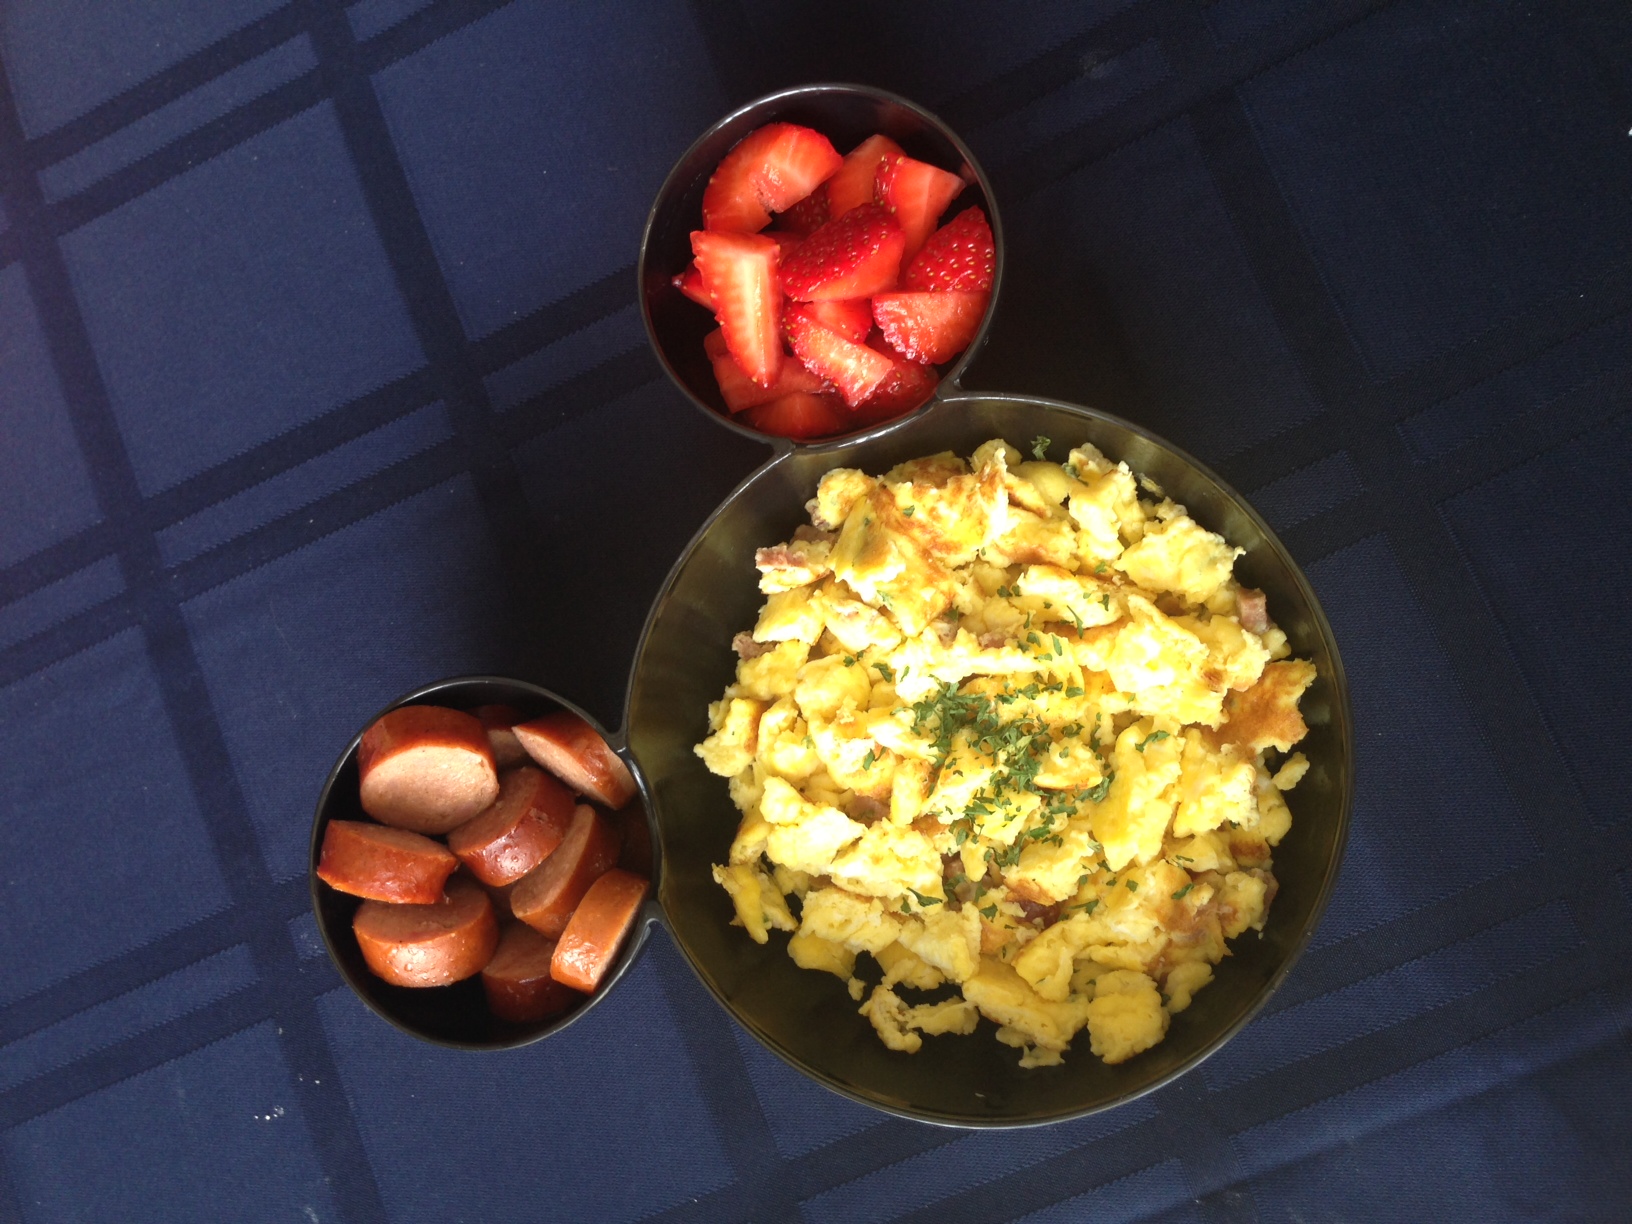
I have also found that I miss several of my favorite breakfast proteins, because they are hard to chew. Bacon is definitely on this list. I have not found a way that I can cook bacon with a texture that I can eat without teeth. Bacon always seems to end up crunchy or chewy (which is the correct order of things in the universe really). I have figured out that if I can chop bacon or my favorite sausages up, then I can eat some amount of them. My favorite protein rich breakfast has become scrambled eggs with chopped (really finely chopped) bacon or sausage cooked into them. I usually cook egg whites because I am sensitive to too much egg yolk (and my huskies are always happy to eat the unwanted yolks with their kibble). If I have time in the morning I can eat several scrambled egg whites with bacon or sausage chopped inside (I also add some parsley of other herbs for some color and flavor). Then I can add a serving of a soft cook sausage links or patties, chopped into small pieces that I can gum to death. Add some soft fruit like chopped strawberries, blueberries or raspberries and I have a pretty complete, and very high protein breakfast. If I have time I can add a piece of toast or a frozen waffle or toaster pastry to make this a complete breakfast (or the waffle or pastry can be taken to go if I am out the door early in the morning). Most of the proteins here can be made several days in advance so that it’s a quick job for the microwave in the morning (I just have to watch getting stuff to warm and letting the microwave dry out the food so much that I can’t eat it). It seems like extra work to think ahead about breakfasts, but I have discovered if I am working a long day, I may not get a long enough lunch break to actually eat anything in my toothless state. So having a good, hearty and filling breakfast is the best solution for me before I work an 8 hour photo event without a break. Viva breakfast!!

Toothless_Signature

Garlic Grilled Lamb Chops

LambChop

So we are now at the height of BBQ season here in Colorado. Unfortunately, that can mean that any time you intend to bbq, the weather may completely disagree with you. I have ribs in my fridge that have been marinating for four days, and we keep getting afternoon wind and thunderstorms that prevent firing up the grill ☹ I do enjoy bbq meat recipes that allow for some wiggle room in the time the meat can stay in a marinade. One of my favorite summer treats are thick cut lamb chops on the grill. Cosco seems to always have nice 2-inch thick lamb chops this time of year. I have an awesome marinade for the lamb chops, and it seems to be OK if the lamb is in the marinade for a few hours, or a couple of days which always helps here with crazy weather. The lamb chops are also easy to cook to several different temperatures on the grill. I can cook them on low heat, without getting a sear on them for me the toothless one. I can cook them with a nice sear and great grill marks at a higher temperature for others. These are great for dinner parties!

Garlic Marinated Lamb Chops

12 lamb loin chops
¼ cup Dijon mustard
1/3 cup minced garlic
¼ cup soy sauce (I use low sodium)
1/3 cup canola oil
½ cup red wine (which can also be served with the meal if you like wine)
1 tsp ground pepper

I use a gallon ziplock bag to mix the marinade. Once I add the lamb chops I tend to put it in the fridge in a bowl just to prevent any unfortunate leaks. I buy lamb chops in groups of eight and this amount of marinade works well. I tend to add a little more of the mustard and I often use honey Dijon mustard. If you are not a fan of soy sauce (or sensitive to too much soy) you can just add about a teaspoon of salt and skip the soy sauce. These are always great when served with grilled garlic red potatoes and fresh corn on the cob which can be grilled right in the husks. I so love summer menus that can be completely cooked on the grill so there is no mess or extra heat in my kitchen!

Toothless_SignatureJaime

Toothless Cooking Tools

Favorite_Tools

Today I thought instead of looking at a recipe, I figured I would share all the wonders of my two favorite kitchen gadgets. I am still learning how to cook for me (the toothless one) and my husband, the carnivorous and toothy-one. I have found a couple of wonderful kitchen tools that help me to make meals that I can eat (without having to put my whole plate in the blender) and that keep my husband happy. He will eat anything I make, but I would feel bad if every single thing I made was mush, plus I couldn’t stand that either.

My first gadget that is a must have for any household with somebody on a soft (toothless or no chew) diet is simply called a Mix n Chop. The one we have is a pampered chef version, but these gizmos can be found at cooking stores and online. I have seen giant versions of this tool used on some of my favorite cooking shows too. Did you ever wonder how to get ground beef finely smushed for entrees like tacos or spaghetti? Any Mexican restaurant we eat at always seems to have such fine ground beef. I had tried putting it in my little chopper after I had browned it, and the beef just gets this nasty texture that is not appetizing. This little black gadget is the answer. As you can see from the above picture, this little black tool has curved paddle type blades on the bottom. I simply use it to smash up the ground meat in the pot while I am browning it. This allows me to get all the ground meat into smaller than pea size pieces (it also allows me some anger management time ☺). This helps me a ton because then I never get that random grape or almond sized chunk inside my burrito that I have to try to gum to death. This tool is also dishwasher safe, which makes me even happier. I use my smasher friend on ground meats in Mexican food, hamburgers, meatballs, soups and Italian meat sauces. This little tool really has been a game changer for me!

My second essential kitchen gadget is my immersion blender, also known as a stick blender. These little guys are available all over. They can be found locally at places like Target and Kohl’s as well as at high end cooking stores and of course online. There is quite a bit of variation in these tools as far as quality of construction and attachments. This also means there is a lot of variation in price. I have had three of these guys, in the period of about a year. My first one had a plastic base and was very inexpensive. That was not a great investment as the plastic cracked after just a few uses, which allowed soup to get inside the housing and ickyness followed. Version two had several different attachments on the bottom with different blades. The problem with this guy was the place where those attachments clipped on, also did not seal, so there was ick pretty quick on that blender. My current favorite is the Breville (pictured above) and I love it. This one cost a lot more but it is so worth it. It had a plastic bottom lining to protect the coating on my non-stick pots. The whole lower half of this blender is stainless steel and it is all sealed. So no more ick getting into the blender! This version also has different speeds, so I have the ability to very gently blend dessert items, or I can throw down the hammer on pots of stew or pasta sauces. Quick note, immersion blenders do not seem to have the same effect on potatoes as a food processor, so fear not if you are blending a dish with tomatoes.

I could not cook without my immersion blender. It seriously has changed the way that I cook because I can use it in almost any container. I use this tool to blend my veggie soups right in the pot as well as I can slightly blend meat sauces to make them a little more smooth (great for spaghetti sauces with big chunky tomatoes). It is perfect because I control how blended the dish become; I can blend until it is totally smooth, or I can leave some texture and small chunks behind. This tool is also a lifesaver for me on nights when my mouth is just really sore and my gums hurt too much to keep trying to gum that beef stew or pot roast or other dish. I can simply use my immersion blender right in my bowl of stew or on my pot roast, carrots and potatoes and smush it just enough that I can simply swallow the food, but it still has texture and taste and it does not look like baby food. The only drawback is that the blender part is not dishwasher safe, but I will happily hand wash this guy, for all of the help that is has given me!!

Toothless_SignatureJaime

Dairy/Gluten Free Peanut Bars

CornFlake_Bars

When I was younger, finding really great desserts that were dairy free was always a challenge. We found a recipe for corn flake peanut butter bars that was awesome! This recipe is great because it is dairy free if you want it to be, but you can also add chocolate to these bars for those without allergies. This was always our go to recipe for when we were taking treats to school, Girl Scouts, church events and play dates. These peanut butter bars were always a big hit, whether they had chocolate chips, caramel chips, peanut butter chips or if they were plain. I also realized later these are gluten free depending on what brands of ingredients you use. These do have peanuts (lots of them!) so they are definitely not for those with peanut allergies.

1 cup light corn syrup
1 cup brown sugar
1 cup peanut butter
1cup peanuts (optional)
6 cups corn flakes

Optional:
6 oz chocolate or other type of chips
1 Tbsp veggie oil

Using a microwave safe glass bowl, combine the corn syrup and brown sugar. Heat in the microwave for 4-5 minutes until melted and boiling (you want the sugar to melt so the sauce is not gritty). Stir in the peanut butter until well mixed. Pour the liquid mixture into a large bowl with the corn flakes and peanuts. Mix to coat the cereal well. Press mixture into a well-greased 8×12 inch glass baking dish (this is a great job for little hands ☺). In a separate microwave safe bowl, combine the chocolate chips with the vegetable oil. Microwave for 1-2 minutes until the chips are melted and completely smooth. Spoon the chocolate mixture over the corn flake bars forming a nice even coating. Refrigerate for at least one hour until chocolate has set. Then slice bars to desired size. Store bars in a cool (refrigerated) place.

In our house we always halved the amount of chocolate chips and only coated half of the bars with chocolate so I could eat the plain half. Occasionally you can find dairy free “chocolate” chips and feel free to use these if you like. I did figure out recently that I could use carob chips in this recipe and they are quite tasty (but they can be hard to find and don’t melt as smoothly). You could also use nice dark chocolate bars for the topping if you are a dark chocolate lover. I also have recently started making these without the peanuts as I no longer enjoy the crunchy nuts because they are hard to chew (without teeth). I think my favorite thing about this recipe is that it is super easy and kiddo friendly if you have young ones who like to help in the kitchen. You can also put the mixture in greased muffin tins to make individual little bars. By putting out candies and other toppings these can be fun at a kiddo birthday party activity where everybody can decorate their own treat! Once they are chilled you can also use cookie cutters on these to make fun shapes. So try these out, then see what variations you can create and share them here!!

Toothless_SignatureJaime

Potstickers

Potstickers

With all of my Dads’ family still living in Hawaii, we have spent plenty of time there over the years. I grew up enjoying the unique foods that are available there such as spam, plate lunch, saimin, Maui chips, and shaved ice. My favorite dish that I have learned how to cook is potstickers. I love that once you learn how to make them, you can alter them in any way you wish. They can be filled with savory or sweet items, and the potstickers can be steamed, pan fried, or deep-fried. Think of them as a pizza, where you can add any toppings and in any combination that you like. So here is the basic steamed potsticker recipe. (Steamed and soft potstickers are a great protein source for someone with a lack of ability to chew)

1 package won ton wrappers
1 pound of ground pork
4 green onions (white and green parts chopped)
¼ cup water chestnuts finely chopped (optional)
Small bowl of water

Won ton wrappers are fairly easy to find at most grocery stores. They come in round or square shaped. Try looking in the produce refrigerators or where the packaged tofu is located. Once you buy a package of the wrappers they stay good for a couple weeks so you do not have to use them immediately.

Mix the ground pork, green onions and water chestnuts until just combined. Here is the slightly tricky part, wrapping your potstickers. Using a cutting board or other work surface, lay out several individual won ton wrappers. Place about a spoonful of the pork mixture into the middle of the circle won ton wrapper. Then dip your index finger in the bowl of water and run your damp finger around the edge of the wrapper. Now fold one side over and seal the edges together. You should now have a half moon shaped potsticker. It will be able to stand up on its bottom with the sealed edge pointed up. If the wrapper does not stick together well you can use a little more water. If you are using the square won ton wrappers, arrange your empty wrapper with one corner pointed up and put your spoonful of meat mixture across the middle on the horizon. Run a dampened finger around the edges. Fold the top corner down to meet the corner that is pointed down. Then seal the two sides and curl them inwards. This should end up looking almost like a tortellini shape. Set up a pot with water and a steamer assembly (depending on your steamer container you may want to use a little bit of cooking spray to prevent sticking). Working in batches you want to steam the potstickers for 5 minutes or so, until they are soft and the filling has been steamed. It generally works well to form about 10 potstickers, start them steaming, and then form another set of ten potstickers so you can steam in batches. As you make the potstickers you will also get a feel for exactly how much filling you can put inside without suffering a potsticker blowout during steaming.

Serve the potstickers warm or at room temperature with a dipping sauce. A simple dipping sauce is soy sauce with chopped green onions (maybe add a little crushed red pepper for kick). Or you can use any store bought sweet and sour, or teriyaki sauce. Sometimes the Asian section of the grocery store will have specific sauces for potstickers. Experiment and find what you like! If you do not have a steamer assembly, you can cook the potstickers in a frying pan just as easily. Put a couple tablespoons of peanut oil (or vegetable oil if you have a nut allergy) in the bottom of a skillet. Cook the potstickers in the oil over medium high heat for about a minute. Then add about a half cup of water into the skillet and immediately put a lid on the skillet (watch out, there is a splatter moment here). Steam the potstickers for about 5 minutes. This cooking method gives a potsticker with some golden crunch on the bottom and a nice and soft steamed exterior. The last option is to toss the potstickers in a deep fryer set at 350 degrees until they float to the top. Remove them to paper towels to absorb the extra oil.

Once you have mastered making the potstickers, the fun of varying the recipe can begin. You can make vegetarian potstickers with a filling of finely shredded cabbage, carrot, onion, water chestnuts and green onion. You can make dessert potstickers by filling the wrapper with apple or cherry pie filling. Feel free to add cinnamon and nutmeg to the dessert versions. The sweat potstickers are very good deep-fried, they are like mini fruit pies. Try dusting them with powdered sugar, yum! For lower calorie potstickers you can substitute ground turkey or chicken in the recipe above. Use ground beef, refried beans and Spanish rice in a filling for a Tex-Mex version that is awesome deep-fried. You can do vegetarian Tex-Mex potstickers with corn, beans, rice and cheese. See what other versions you can think of and feel free to share!!

Toothless_SignatureJaime