Olive Garden style Pasta Fagioli

Pasta_Fagioli

Everybody loves to eat out at restaurants. It is always fun when you can find recipes for your favorite chain restaurant staples. Plus, it’s so much less expensive to make your favorites at home, not to mention you can tweak the recipe and make it exactly the way you want it. I love these type of recipes because at home, I have complete control over what I put in a dish, and there is no dealing with special orders or seeing if the restaurant kitchen can even alter a dish to be say dairy free. With no teeth, I also find at home I have complete control over how well done or crispy items get, which is necessary in my life without teeth. I have found lots of my restaurant favorites are fairly easy to find online. The great tool that is Google makes it very easy to find recipes for lots of homemade versions of these yummy staples. One of my absolute chain favorites is the Pasta Fagioli soup at Olive Garden (when I can get it without cheese). This was a very easy recipe to find on Google. There were tons of different versions. This is my version that came from several different web variations that I have tweaked to be dairy free, celery free and heavy on the pasta (because that is my favorite part). With lots of practice making this soup, I have also gotten pretty good a making it easy to eat without teeth and most importantly without a blender!

2 lbs ground beef
12 oz chopped onion
14 oz slivered carrots
14 oz diced celery
48 oz diced or crushed tomatoes
1 14.5 oz can red kidney beans
1 14.5 oz can white kidney beans
88 oz beef stock (or you can blend beef and veggie stock)
3 tsp dried oregano
2 ½ tsp cracked black pepper
5 tsp chopped parsley
1 ½ tsp Tabasco sauce (Optional)
48 oz jarred spaghetti sauce
8 oz dry ditalini pasta

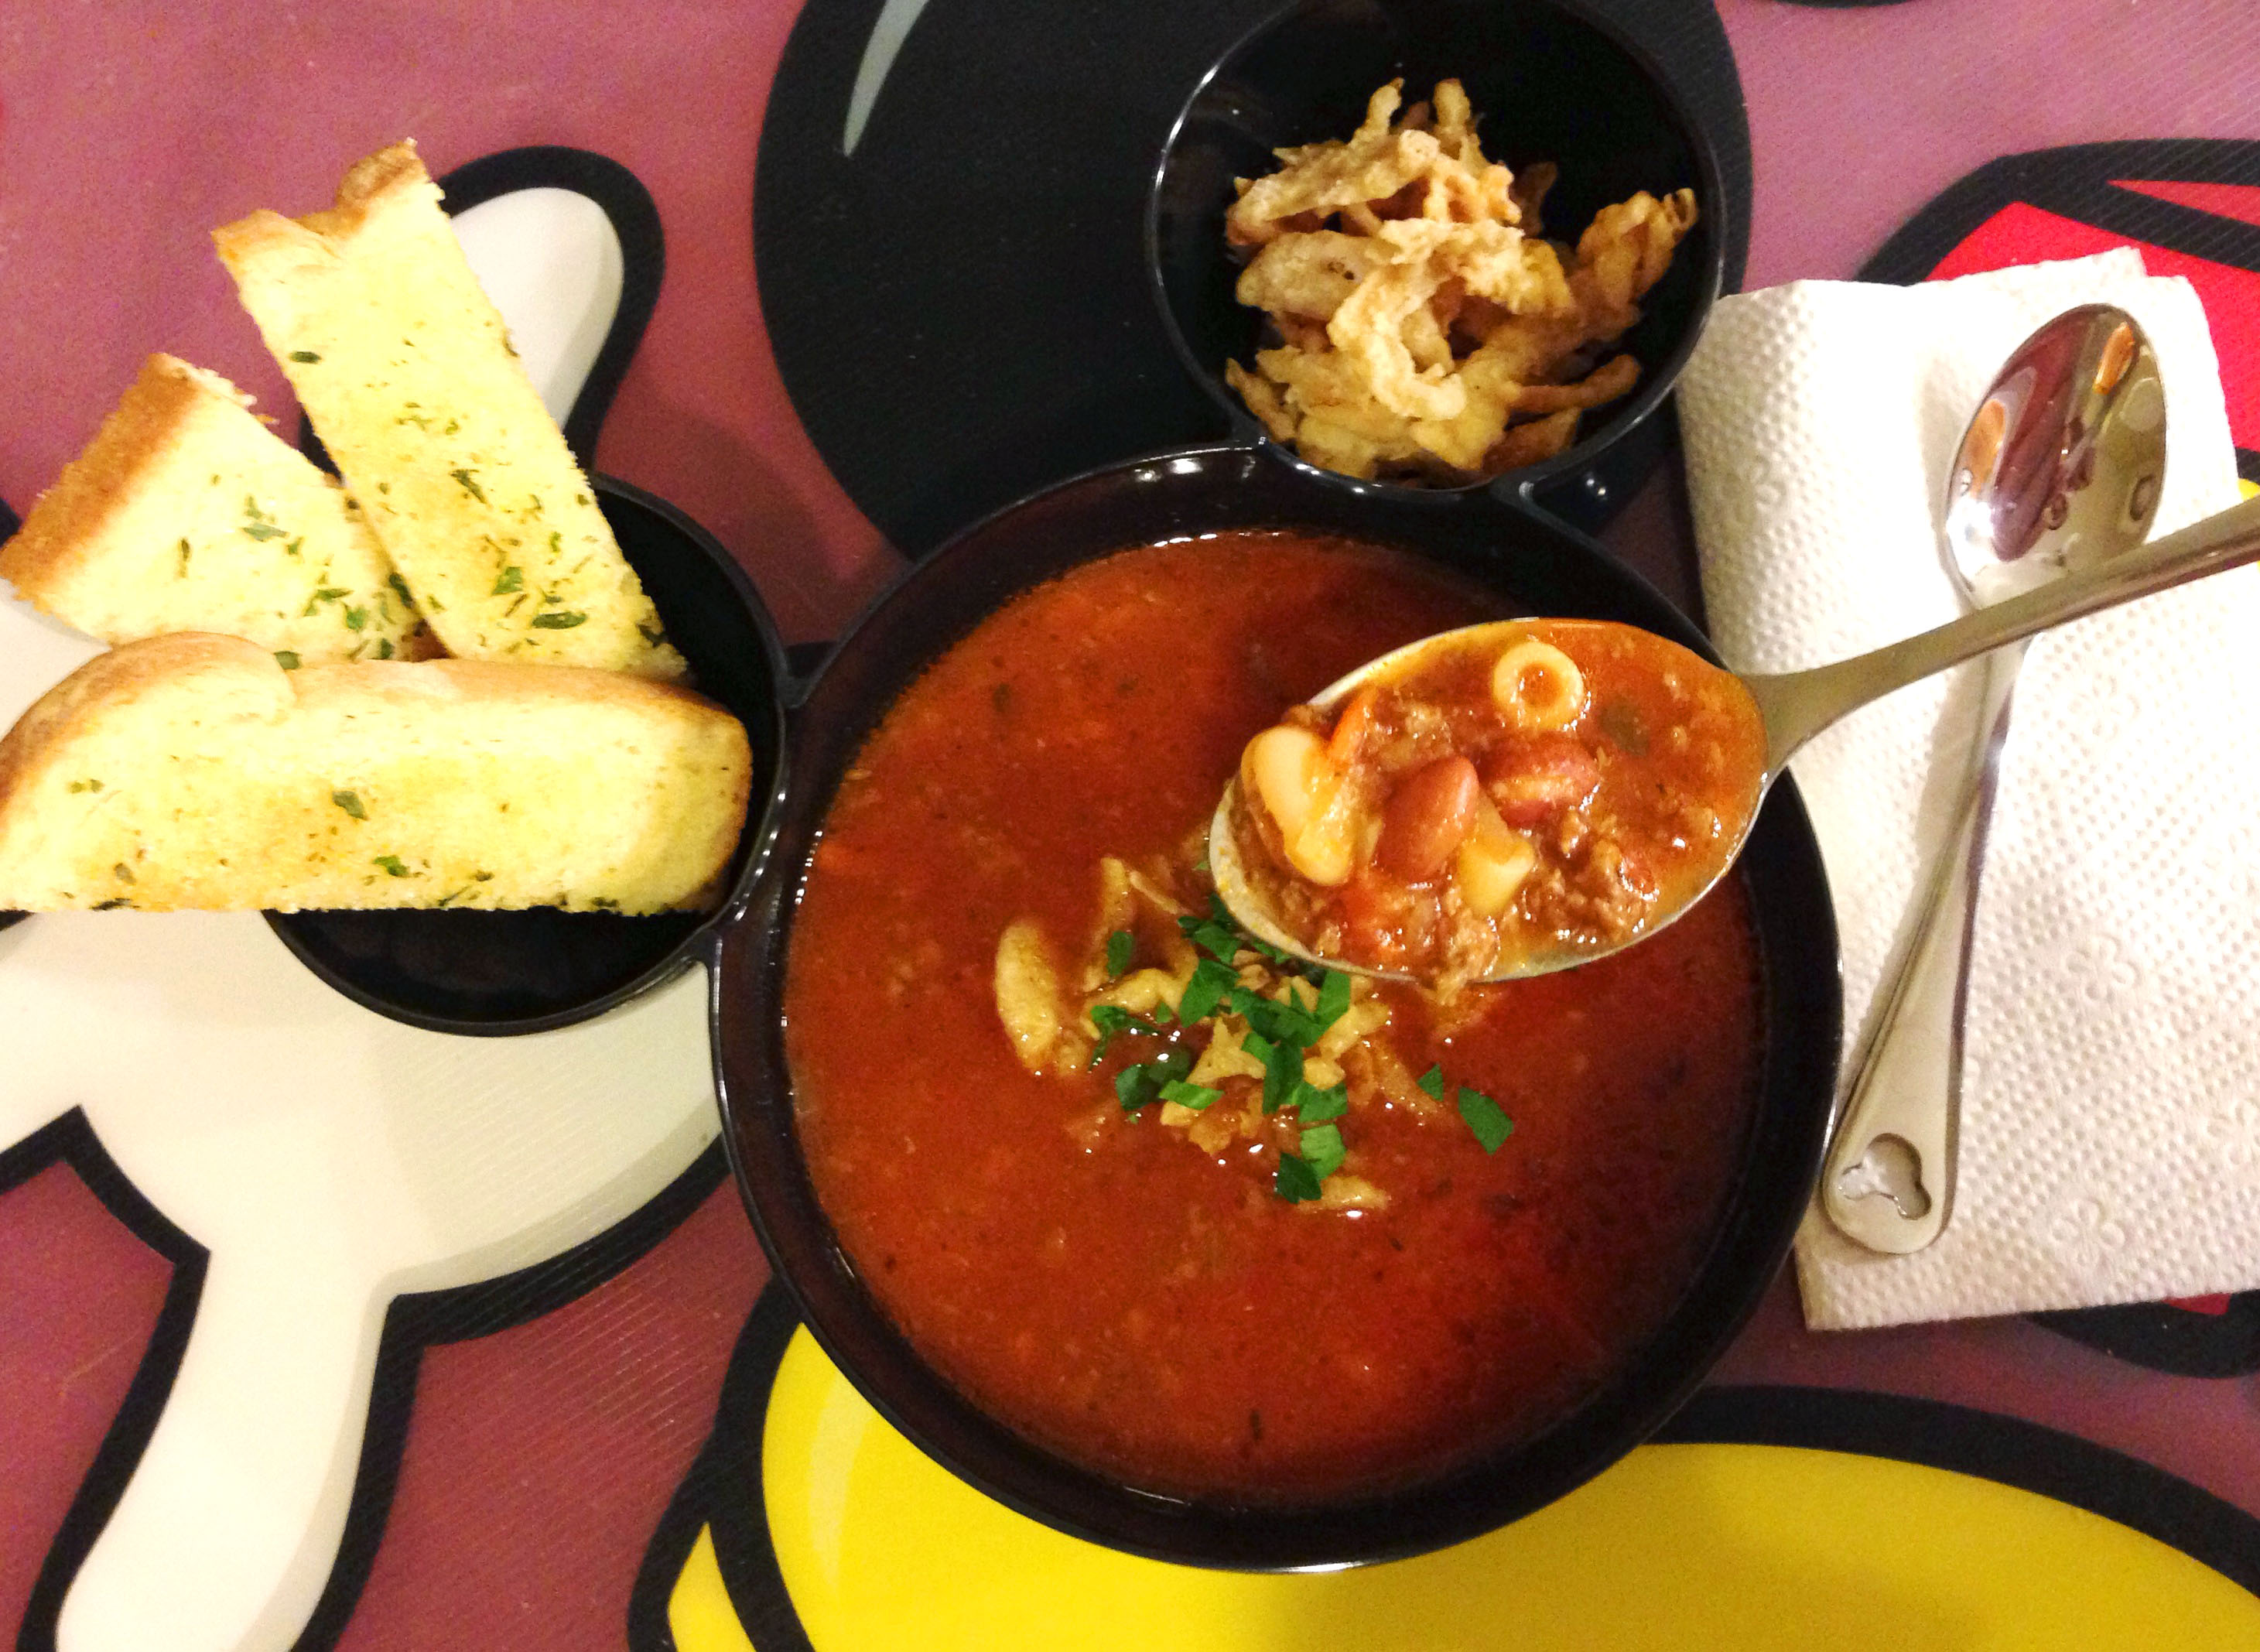
Start by browning the ground beef in a large soup pot (if you make this whole recipe you will need at least a 7 quart soup pot, an 8 quart pot if you like to use more liquid for a brothier soup). I usually drain the excess beef fat before proceeding. Add the chopped carrots, celery and onions and cook until they start to soften, about 10 minutes (I cook them for a lot longer until they are really soft and tongue squishable). Add in the tomatoes and the beans and mix well. Stir in the beef stock and the oregano, pepper and parsley. Bring the pot to a simmer and add the Tabasco if desired as well as the jarred spaghetti sauce (I like using a garlicy Prego) and the dry pasta (any small shaped pasta will work well here). Keep the soup at a low simmer and cook (stirring often) until the pasta and the veggies are tender, usually about 45 minutes. Serve with parmesan cheese for those who want to add it as well as garlic bread or breadsticks (I just use a little margarine and garlic salt on whatever bread we have or I use canned breadsticks). You can also add fried onion strings on top to give the soup a little crunch (I pass on the crunchyness).

This soup is so close to the Pasta Fagioli at Olive Garden and I love the ability to alter this delicious one pot dinner. I usually skip the Tabasco because it bothers my mouth, my husband will add a ton of Tabasco to his bowl anyways ☺ I also skip the celery since I am mildly allergic to it and picking the little pieces out of the soup later is annoying. I use a little more of the carrots and onions to make up for skipping the celery. I have also figured out that it helps to shred the carrots in the food processor and to dice the onion as fine as possible. This helps to get the veggies to cook so they are tender enough that I can gum them easily. A little warning, this recipe makes a ton of soup. My husband and I almost always halve the recipe for fear of having soup for weeks. We have tried freezing this soup and it does work great, and it’s super easy to reheat and use as a quick meal at a later date. If you halve the recipe we have also found that the unused half cans of beans freeze well in a ziplock bag for the next time. A general caution, the pasta will inhale and absorb lots of the broth, so if you like a brothier soup, be prepared to throw in an extra can of beef stock. If you happen to have fresh parsley, it is super yummy here and it makes a pretty garnish. And lastly, I am not a huge bean fan as they are a little tough to eat with no teeth. Occasionally I skip the beans all together and simply use 1.5 times the pasta. I would love to hear of other variations or add-ins that go well with this recipe. Please try this out, then share your variations here!

Toothless_SignatureJaime

Carbonara-Style Pasta

Asparagus_Carbonara

Carbonara-style Tagliatelle with Asparagus and Lemon-Herb Breadcrumbs

When I found this recipe I was super excited. Not only was it very easy to make this pasta dish dairy free (just skip the cheese), but it is a great recipe when I am in a hurry and just want a quick dinner. It is also very easy to make this dish soft enough that I don’t have to chew it a ton. I have used leftover asparagus and several different leftover proteins in this dish and it is always yummy (the photo above included left over ham steak and whole wheat fettuccine). I found this recipe on Foodnetwork.com and I have made it so many times, it has never been the same twice, but it’s always yummy!!

So here is the basic recipe:

1 pound asparagus, trimmed and washed
4 T extra virgin olive oil (plus extra to drizzle on the top)
Kosher salt
2 T butter or margarine
Grated lemon zest (2 lemons)
1 cup breadcrumbs
¼ cup finely chopped fresh chives
¼ cup finely chopped flat-leaf parsley
1/3 pound pancetta, chopped
1 tsp black pepper
4 cloves of garlic, grated
½ cup dry white wine
3 egg yolks
1 pound egg tagliatelle pasta (or any pasta shape)
1 cup grated pecorino cheese

Trim the rough ends off of the asparagus and lightly drizzle with olive oil. Grill the asparagus until lightly charred and tender, about 7 to 10 minutes. Cut into 1-inch pieces on an angle. Heat a large pot of salted water to boiling. In a small skillet, heat 1 T of olive oil over medium heat. Add the butter and heat until melted, then add in the lemon zest and breadcrumbs. Stir until moistened and golden brown. Then add in the chives and parsley and take the skillet off the heat. Heat the remaining three tablespoons of olive oil in a large skillet over medium heat. Add the pancetta and the pepper and cook for three minutes, stirring well. Add the garlic and cook while stirring for another 2 minutes. Deglaze the pan with the wine and turn the heat down to low. Lightly beat the egg yolks in a small bowl. Cook the pasta in the boiling water until al-dente (or until soft if you are toothless like me). Save 1 cup of the cooking liquid and drain the pasta. Beat the reserved water into the egg yolks to temper them. Add the asparagus to the pancetta mixture and heat through. Mix the pasta into the skillet with the asparagus and the pancetta mixture. With the heat off, pour the egg mixture over the top of the pasta mixture and toss for a minute or two. Here is where you add in the cheese if you like, I omit the cheese and simply put it on the table for those who want it. Put the pasta in a serving dish and coat with the lemon breadcrumbs, drizzle with a little extra-virgin olive oil if desired and serve.

The thing that I love most about this dish is that I tend to make it to use leftovers and it makes for a super fresh twist every time. I have used leftover asparagus many times. I have also served this with leftover parmesan crusted chicken for my husband to take for lunch. When I have leftover pork chops or ground pork and veal meatballs or leftover ham or ham steaks I love to add them into this recipe. When I have the last bit of a loaf of bread that is getting hard, I like to make my own breadcrumbs that I can use here. I have also made a small batch of this recipe when I have left over pasta that I need to use, any crazy shaped pasta will work. So try this recipe out, then try diggin’ in your fridge to see what you can add to enhance this in your own way!

Toothless_SignatureJaime

Dairy/Gluten Free Peanut Bars

CornFlake_Bars

When I was younger, finding really great desserts that were dairy free was always a challenge. We found a recipe for corn flake peanut butter bars that was awesome! This recipe is great because it is dairy free if you want it to be, but you can also add chocolate to these bars for those without allergies. This was always our go to recipe for when we were taking treats to school, Girl Scouts, church events and play dates. These peanut butter bars were always a big hit, whether they had chocolate chips, caramel chips, peanut butter chips or if they were plain. I also realized later these are gluten free depending on what brands of ingredients you use. These do have peanuts (lots of them!) so they are definitely not for those with peanut allergies.

1 cup light corn syrup
1 cup brown sugar
1 cup peanut butter
1cup peanuts (optional)
6 cups corn flakes

Optional:
6 oz chocolate or other type of chips
1 Tbsp veggie oil

Using a microwave safe glass bowl, combine the corn syrup and brown sugar. Heat in the microwave for 4-5 minutes until melted and boiling (you want the sugar to melt so the sauce is not gritty). Stir in the peanut butter until well mixed. Pour the liquid mixture into a large bowl with the corn flakes and peanuts. Mix to coat the cereal well. Press mixture into a well-greased 8×12 inch glass baking dish (this is a great job for little hands ☺). In a separate microwave safe bowl, combine the chocolate chips with the vegetable oil. Microwave for 1-2 minutes until the chips are melted and completely smooth. Spoon the chocolate mixture over the corn flake bars forming a nice even coating. Refrigerate for at least one hour until chocolate has set. Then slice bars to desired size. Store bars in a cool (refrigerated) place.

In our house we always halved the amount of chocolate chips and only coated half of the bars with chocolate so I could eat the plain half. Occasionally you can find dairy free “chocolate” chips and feel free to use these if you like. I did figure out recently that I could use carob chips in this recipe and they are quite tasty (but they can be hard to find and don’t melt as smoothly). You could also use nice dark chocolate bars for the topping if you are a dark chocolate lover. I also have recently started making these without the peanuts as I no longer enjoy the crunchy nuts because they are hard to chew (without teeth). I think my favorite thing about this recipe is that it is super easy and kiddo friendly if you have young ones who like to help in the kitchen. You can also put the mixture in greased muffin tins to make individual little bars. By putting out candies and other toppings these can be fun at a kiddo birthday party activity where everybody can decorate their own treat! Once they are chilled you can also use cookie cutters on these to make fun shapes. So try these out, then see what variations you can create and share them here!!

Toothless_SignatureJaime

Dairy-Free Green Bean Casserole

GreenBeanCasserole

After having a couple of weekends of cold and snowy weather, I found myself making an oven baked classic veggie dish several times. When it’s cold outside I love using my oven, both for the great smells and the extra heat that can help to warm the kitchen. Besides, on a cold and snowy night what’s better than a warm, bubbly and creamy casserole? Here is how I make green bean casserole so that it is both dairy free and soft enough that I can eat is with my lack of teeth.

1 (10 ¾ oz) can of golden mushroom soup (Campbell’s is easiest to find)
¾ cup of rice, soy, oat or hemp milk
1-1/3 cups French’s fried onion strings
2, 14oz cans of canned green beans, drained
pinch of black pepper to taste

Mix together the soup and the milk in a bowl. Add the pepper to taste (about 1/8th of a teaspoon, more if you like a little more kick). Salt is not needed here because of all of the salt in the canned soup and the canned green beans. Add the drained green beans and 2/3 cup of the fried onions and mix. Pour mixture into a 1 ½ quart oven safe casserole dish. Bake at 350 degrees for 25 minutes or until just bubbly. Top with the remaining 2/3 cup of fried onions and bake for another 5 minutes until the topping is just browned. Enjoy!

I have made this recipe with soy milk, oat milk and rice milk, all successfully. My husband and I found that soy milk always seemed to have some amount of aftertaste. I am pretty allergic to soy at this point so the rice milk is a safer alternative. Plus you can find rice milk at bulk stores like Cosco, and it stores at room temperature until opened. If you do not enjoy the texture of canned green beans, this recipe works well with frozen green beans. I prefer the nice soft texture of the canned green beans because they take less chewing. I love the flavor of the golden mushroom soup. It gives a nice hint of tomato to this casserole and it helps to thicken the rice milk. This recipe has become a staple at our holiday meals and on cold days. I hope you give this version a try!

Toothless_SignatureJaime