Dairy-Free Coconut Orange French Toast

Coconut_Orange_FT

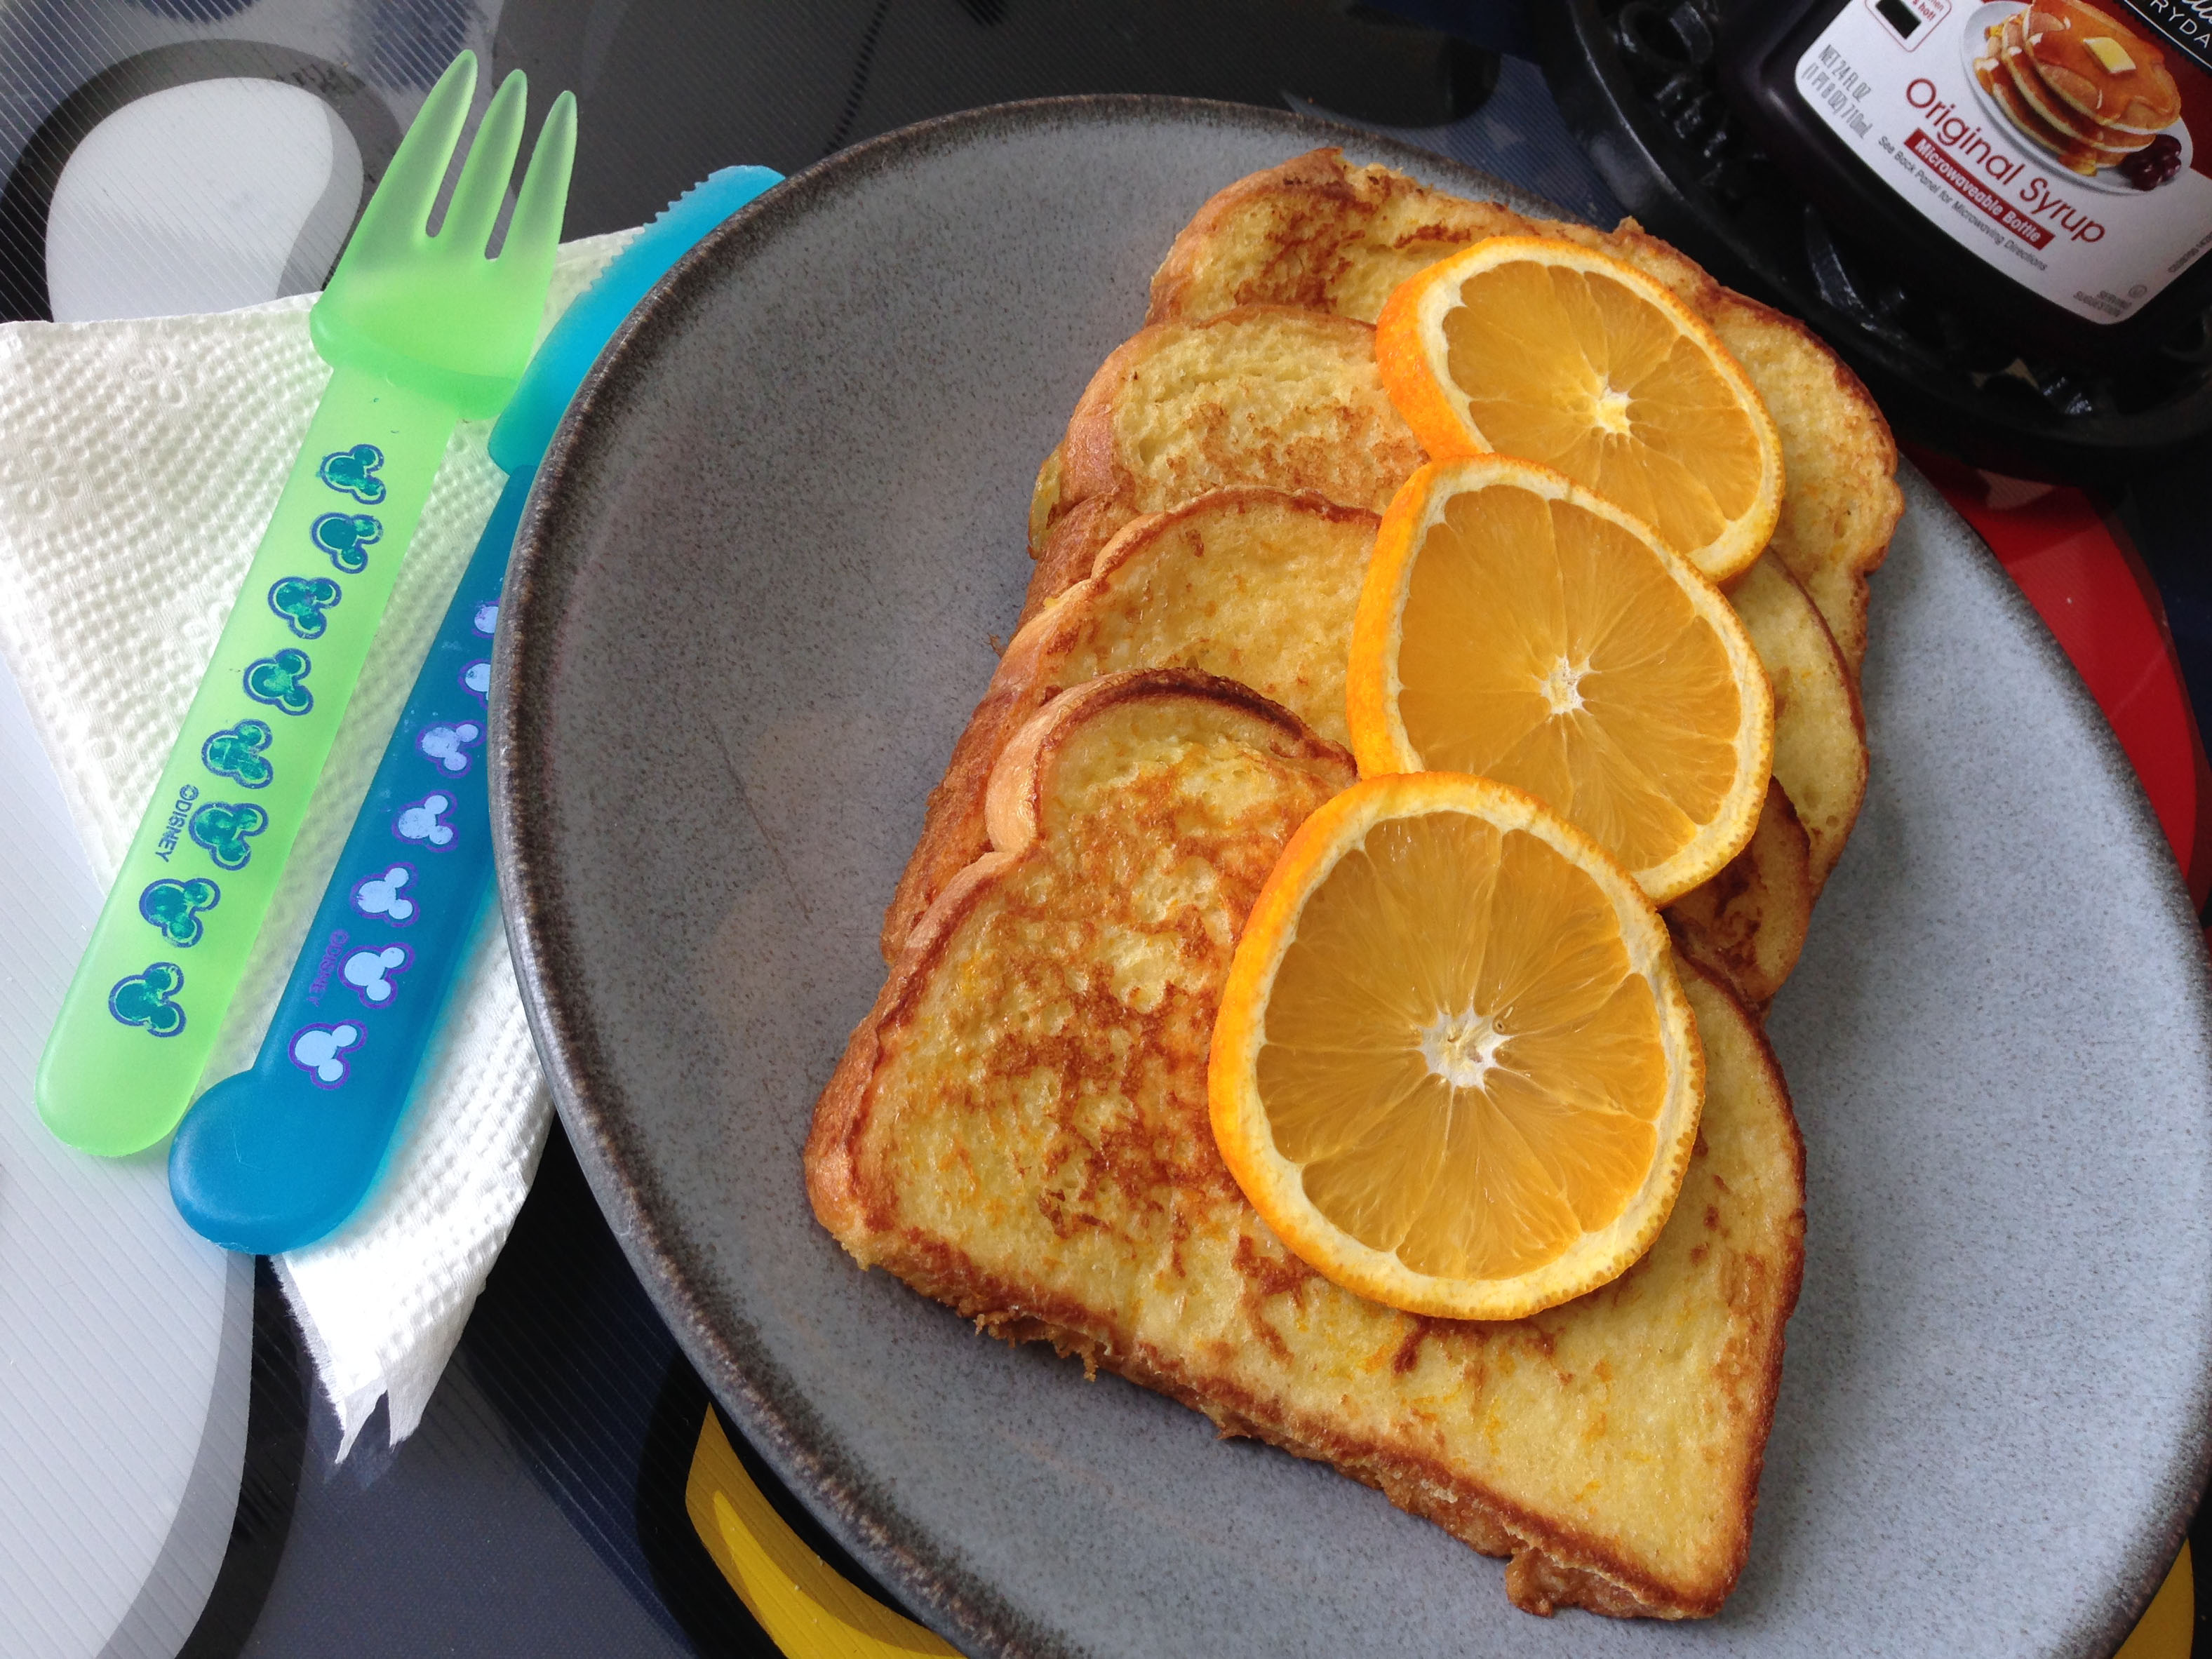
Dairy Free Coconut Orange French Toast

There are just those days when I really seem to want breakfast. I tend to not be a breakfast eater normally, but there are those weekend days when there is just nothing better than a good meal. This past weekend was one of those days where we had a long day planned, so we started the day with a yummy plate of French toast.

Of course with a dairy allergy there had to be a milk substitute involved. Following along with my new love for coconut milk, this was my choice. Now I know everybody has their own favorite way to make French toast, whether its with fruit or filled or crusted with cereal. One of my favorites has always been with some orange zest in it. I like the cleaner, less heavy taste of French toast with a little citrus. So I combined orange and coconut and it was super good, so now I have a new variation for weekend breakfast.

Coconut Orange French Toast

3 whole eggs
¼ cup vanilla coconut milk
1 tsp vanilla extract
2 tbsp coconut flavored sugar (or plain sugar)
zest of one whole orange (1-2 tsp)
1 tsp of fresh orange juice
8 slices of bread (I used sliced potato bread)

Butter, margarine or veggie oil for the skillet.

Combine all the ingredients in a shallow dish. Whisk briskly to be sure all of the egg is mixed in well. Heat a skillet or griddle on medium heat with butter or oil. When warm, dunk your bread of choice in the egg mixture then flip to coat both sides. Grill the toast on one side for a few minutes until a nice golden crust is formed. Flip the toast and grill on the second side until the same color is reached. Work in batches to dunk and then grill toast until you have used all the batter. I made 8 slices of French toast with this amount of batter. I serve the French toast with sliced oranges (convenient way to use the zested orange) and maple or coconut syrup. I have coconut pancake syrup that is good (but sweet) with this French toast. The coconut flavored sugar that I used here is a product I get in Hawaii, but plain granulated sugar would work as well. In the past, I have also sprinkled this French toast with shaved coconut. This recipe has a very subtle coconut flavor but the lovely orange flavor is certainly dominant. And you can’t beat a great breakfast in 15 minutes!

Dairy-Free Coconut Pudding

Coconut_Pudding

So it would appear that I have been away from Toothless Wahine for quite some time. After a busy fall and a cold winter I am finally back to doing some new experiments in cooking. We also have a new piece of hardware that has been added to our cooking equipment. This fall my husband and I joined the ranks of backyard BBQ enthusiasts when we bought our very own smoker. It has been a struggle to use the smoker when it’s been so cold and snowy but I will certainly have some smoker blogs coming up soon. For now, I want to start sharing my new obsession in life : coconut milk.

As I am allergic to milk substitutes like soy or almond and cashew milk I have always struggled a little bit with the remaining choices: oat, rice and coconut. Oat milk has a very mild flavor and is good in cereal, however, we have never loved it in mashed potatoes or other creamy dishes. My husband is not a huge milk fan but he is vocal about if things like mashed potatoes are creamy enough. On a side note Sprouts and Whole foods stores here have single serving (8oz) cartons of oat milk which is nice when I don’t want to open a whole quart container as I often don’t use the whole container before it goes bad. My go to milk until recently has been rice milk. Again, it has a very neutral flavor and does not tend to leave an after taste likes lots of other milk substitutes can. It can also be found in juice box sized boxes at several health food stores. Rice is incredibly allergy friendly so places that are looking for an extremely allergy friendly milk alternative seem to favor rice milk. FYI most of the Disney parks and the Disney cruise ships carry rice dream products, you just have to ask! So, while rice milk works well, it is very thin and not fatty, so it does not pass my husbands creaminess test.

I don’t know why I have stayed away from coconut milk for so long. I like the flavor of coconut in small amounts but I am certainly not going to drink a glass of coconut milk or eat a handful of coconut flakes. There has also been a concern in the back of my mind that coconut milk would make any savory dish have too much of a sweet coconut flavor. Boy was I wrong. Coconut milk seems to give a mild sweetness to savory dishes, but that’s about it. The fat content helps make things creamy (yes it passes my husbands’ mashed potato test). It also really does not taste like coconut. Most of the other folks I have used coconut milk with can’t even tell I used it. It certainly worked for our Thanksgiving meal this year. The kiddos present all gobbled mashed potatoes with no complaints! So prepare for some more blogs with coconut in them, and maybe even some remakes of some of my older blog recipes. For today I want to share a very simple coconut milk substitution that turned out to be super yummy!

Dairy free pudding dessert tarts
1 box coconut cream cook and serve pudding mix 2 cups coconut milk
2 graham crackers, crushed
1 handful of sweetened coconut flakes, toasted

I made the pudding by following the cooking directions on the box. Then I put the pudding in four ramikens to make four 1/2 cup servings. I then let the pudding chill in the fridge covered to keep it from hardening on top. After dinner I simply crushed the graham crackers and sprinkled them on top of the pudding. Then I sprinkled the toasted coconut on top. (To toast the coconut I just put it in a small skillet over a low flame and tossed it frequently until it smelled toasty and was lightly browned). So simple, so yummy, and so many ways to vary this idea in the future. I have since made the same pudding and spooned it into mini graham cracker dessert crusts and then topped it with the toasted coconut. I’m excited to try other flavors of pudding in the future!

Non-Dairy Scalloped Potatoes

Scalloped_Potatoes

I am always looking for new recipes that are easy to make for dinner. With my chewing limitations and food allergies dinner can get very repetitive. I spend lots of time looking at recipes online to find new options that are allergy friendly. I came across this scalloped potato recipe and was excited to see that there was no cream or cheese in it. There is milk in it, but I have made this with rice milk or with vegetable stock and it always tastes good. With how sensitive my mouth can still be, I also like how mild this recipe can be. The seasonings here are very mild. My husband likes to add more spice and more paprika to this. I am sure you could also add chili flakes or other spice to this if you desire a zestier side dish. It is also nice to have a side dish that can be cooked in the over next to a meatloaf. Makes for a one-oven dinner!

Kentucky Scalloped Potatoes (Recipe found on foodnetwork.com)

4-5 large potatoes
¼ lb butter
salt and pepper to taste
1 sweet onion sliced thin (I toss it in the food processor)
1 Tbsp fresh parsley (dried works also)
¼ tsp paprika
2 Tbsp bread crumbs tossed in melted butter (optional)
2-3 cups hot milk or milk substitute (I use rice milk)

Peel and thinly slice the potatoes (a mandolin helps). Grease a glass or pyrex casserole dish. Spread a layer of potatoes evenly on the bottom. Follow by some sprinkled onion, salt, pepper and sprinkle with a little flour. Continue layering the potatoes with onion and seasoning in between. After the last layer of potatoes pour the hot milk over the dish. Use enough liquid to cover up to the top layer of potatoes. On top sprinkle a little parsley along with the paprika for color. Sprinkle the breadcrumbs on the very top. Bake the dish for an hour at 350 degrees or until the potatoes are tender. At our altitude here it takes a little longer or a 375 degree oven. (Be sure there is at least an inch of clearance in the top of the dish so it does not boil over in the oven)

The nice thing about this dish is that you can alter the oven time depending on what other dishes you have in the oven. Any temperature from 350-400ish works, just adjust your time. If desired, you can add shredded cheese on top, for cheese lovers!

Toothless_Signature

Dairy-Free French Toast

French_Toast

My husband and I are huge fans of fresh French bread for dinner. It is great with a little butter or dipped in olive oil and herbs. Any meals that have soups, stews or sauces are always great when accompanied by fresh crusty French bread. And I can buy it fresh at the store anytime I need to pick up a few groceries. My husband likes the crusty edges and me the toothless one likes the soft interior parts. So we make a good team. However, we only get through, at best, half of the loaf of bread. Then we always have half a loaf of leftover French bread, day old and no longer crusty on the outside. And we never know what to do with the leftovers. I usually end up taking the (now hard) leftovers and making breadcrumbs out of it. A good use, but I’m always looking for a better use for the leftover bread. When I have time the next morning to make breakfast, I can use my leftovers, and make a super yummy breakfast as well. French toast with my leftover French bread is awesome, and I have a great recipe that makes it allergy friendly and it can be soft and easy to eat for the toothless eater. Add some fresh fruit , eggs and sausage and you have a great Sunday brunch!

French Bread Dairy Free French Toast

6 Eggs
1 ½ cups rice milk (Soy milk also works)
1 tsp grated orange zest
½ tsp pure vanilla extract
1 good squeeze from a honey bear
A dash of kosher salt
½ loaf of leftover French Bread (Or other crusty bread leftovers)
Unsalted butter or margarine
Vegetable oil

Optional for Serving:
Fresh chopped fruit (or frozen fruit) with a little added sugar
Good preserves with lots of chunks
Powdered sugar

Begin by beating the eggs in a shallow bowl. I love my rectangular pyrex baking dish for this. Then add the rice milk, orange zest, vanilla, honey and salt. Wisk the batter until well combined. Slice the bread into ¾ inch think slices. Soak the bread in the batter for several seconds or on each side. I make sure I also get all of the crusts coated. Heat a large skillet over medium heat with a mixture of butter/margarine and vegetable or canola oil just to coat the bottom. Fry the soaked bread several pieces at a time until golden brown on the first side, 3-4 minutes. Flip the bread a fry 3-4 more minutes. French toast can be kept warm in a 250 degree oven until its time to eat. Serve the French toast with different fruits and syrups. I like to use my griddle for the toast, since I can cook most of the slices at one time with the griddle (plus the griddle is the way to go for a brunch party).

This is a very basic recipe that is easy to make alterations and substitutions with. I love a citrus version with lemon and orange zest as well as orange juice substituted for ¼ cup of the milk. This can be served with mandarin oranges and is a summery version. My favorite is to chop fresh strawberries and macerate them in a little sugar and top the French toast with powdered sugar and the strawberries. This dish is easy to alter for other food allergies with various milk substitutes and the bread can be switched out for a gluten friendly bread. You could even top the toast with coconut whipped cream and coconut shreds. Have fun trying different toppings until you find one you like!

Toothless_SignatureJaime

Berry Trifle

Berry_Trifle

So it’s 4th of July week and probably the biggest BBQ holiday of the year. For me there is always the challenge of finding a dessert that I can eat, but that is yummy and travels easily. It also happens that fresh berries end up being on sale the week of Independence Day. So this week I made my favorite dessert to take to parties, a berry trifle.

With all of my food allergies I have always loved angel food cake. It is almost always dairy free and easy to find at grocery stores. Add some fruit and maybe some sorbet or vanilla rice dream and you have an easy strawberry shortcake. With the addition of blueberries you have a very patriotic version. Several years ago I was given a trifle bowl, which makes this dessert look stunning when made for a large group. So here is my all store-bought recipe for an easy fourth of July fruit and cake trifle:

1 2lb package of fresh strawberries
2 pints of fresh blueberries
2 packages (24 count or so) lady fingers
2 tubs (14 oz) strawberry pie glaze (often found in the produce department)
1 32oz container of marshmallow cream

I start by washing the fruit and I set aside a few pretty strawberries and a handful of blueberries for the topping. I then chop the strawberries into small pieces. And then I’m ready to start layering in the trifle bowl. The bottom layer is lady fingers, trying to cover the bottom of the bowl as completely and evenly as possible. This is followed with a layer of strawberries with pie glaze on top, then a layer of marshmallow cream. Here you can repeat the layers if you are making a strawberry only trifle. For the holiday I added a couple layers of blueberries into the mix for the color. Continue layering the ingredients being sure to end the top layer with a generous amount of cream. I then use the reserved whole berries, blueberries and a few lady fingers to decorate the top. This whole dessert can be made in about 15 minutes and all of the ingredients may be store bought making this a very simple dessert.

I have made many different versions of this dessert, and I am sure there are tons of substitutions or variations that would also be delicious. I have used kiwis, blueberries, strawberries and peaches for the fruit layers. For the lady fingers, one could use any pre-made angel food cake or even a chocolate angel food if desired. I have also made this with a vanilla pound cake (when I can find a dairy free version at the store or I can make it myself). As for the marshmallow cream, it is a little sweet for some tastes but it is a good dairy free option (if a little hard to spread into even layers). There are plenty of dairy free whipped topping recipes that use full fat coconut milk and the slight coconut flavor is good with the strawberries. There is also soy whipped topping at some stores but I have not tried it. Of course you could make this with normal whipped cream if dairy is not a concern. These are just the variations I have tried. Have fun experimenting with this one, and happy July 4th!!

Toothless_Signature

Dairy Free Broccoli Soup

Brocolli_Soup

I am sitting here watching it snow again (yes it is April, yes we should be enjoying some warm spring days and yes abnormal weather is the norm in Colorado). Someday here we will warm up and I will get to wear shorts (or at least short sleeves) as well as I will get to start using the bbq again. For now, I am spending another cold and snowy day inside making yummy soup for dinner. I have been on a veggie soup kick for quite some time now. Veggie soups make vegetable nutrition super easy for me, so today I decided to visit another one of my veggie soup staples: broccoli soup. This was a recipe we found in the newspaper when I was in elementary school (yes, the newspaper was that paper thing that showed up on your driveway every morning and it used to be the only way to see the daily comics☺). We found this recipe to be super yummy, and it was easy to make dairy free.

2 tbsp butter or margarine or olive oil
1 cup chopped onion
3 cloves garlic, minced
1 ½ tsp basil
2 tsp thyme
6 cups chopped broccoli
4 cups vegetable stock or water (or you could probably use chicken stock)
1 tsp salt
fresh ground pepper to taste

In a 4-qt dutch oven add the butter or margarine and heat on medium-low heat. When hot, add the onions and cook a few minutes until translucent. Add in the garlic, basil and thyme. Allow to cook for a few minutes, then add the broccoli. Saute until the broccoli is tender. Mix in the vegetable stock or water and allow to heat. Using an immersion blender, mix the soup until smooth right in the pot. (The mixture can also be blended in a couple batches using a blender, then returned to the pot). Adjust the heat to low and add the salt and pepper. Allow the soup to heat again for several minutes before serving.

This soup is great because it is an easy do-ahead for dinner. The soup can remain on the stove over low heat while you finish the rest of dinner and it is not time sensitive. FYI, when I make this soup, I usually take out a few of the cooked broccoli florets and save them to garnish the soup bowls. A nice tip for this soup: it is wonderful with fresh broccoli when it is in season, or inexpensive. However, it is just as good with frozen broccoli in winter months. You can also use frozen chopped onions if you have those in your freezer. I kind of enjoy making this soup with sweet onions when I can find them. Of course, if you use olive oil and vegetable stock or water, this soup is an easy vegan recipe. My husband loves black pepper, so he always adds more to his soup, or sometimes he adds a little cayenne pepper to add some kick. I am sure there are several other spices that could be added to vary this soup, but I love the original recipe and rarely end up varying this soup!

Toothless_SignatureJaime

Fresh Tomato Soup

Tomato_Soup

Since dealing with cancer, I have become a lot more aware of the nutrition in foods. I have also had to concentrate more on packing all the nutrition that I can into any dish I make. I can only eat small portions of food per sitting, so for me it’s important to make every bite count. The one thing that seems to work very well for me is vegetable soups. Veggies can be difficult to eat because they take lots of chewing, or I have to cook them until they are dead and mushy which is no fun. Blended veggie soups are great, because it removes the chewing element and there is still all that great veggie nutrition and fiber. I shared my butternut squash soup earlier, and today I am going to share my version of a tomato soup (this original recipe was from Foodnetwork.com). This soup is great in the summer when tomatoes are cheap, or when your garden suddenly provides pounds of tomatoes all at once. Maybe the best thing about this recipe is that my husband, who hates tomato soup, really likes this one! It helps that there are several veggies in here, so it is not just plain tomato soup!

3 tbsp olive oil
1 ½ cups chopped red onions (about 2 onions)
4 carrots, peeled and chopped
1 tbsp minced garlic (3 cloves)
4 pounds of vine ripened tomatoes, coarsely chopped (5 large)
1 tbsp sugar
1 tbsp tomato paste
¼ cup packed fresh basil leaves (plus some julienned basil for garnish)
4 cups vegetable stock
2 tsp kosher salt
1 tsp freshly ground black pepper

Heat the oil in a large dutch oven, or soup pot over medium-low heat. Add the onion and carrots and sauté for ten minutes or until tender. Add the garlic and cook for a minute. Stir in the tomatoes, sugar, tomato paste and the basil. Add in the vegetable stock, salt and pepper. Stir well and bring the soup to a boil. Then lower the heat and simmer for 45 minutes until the tomatoes are tender. Process the soup with an immersion blender, normal blender or food mill, depending on how chunky or smooth you want your soup. Reheat the soup over low heat. Serve with julienned basil as garnish. You can also garnish and serve with croutons, fried onions or crusty French bread if desired.

This soup is wonderful with any kind of tomatoes I have tried. I usually pick whatever type of tomatoes look good in the store that week, whether that is vine ripened, roma or heirloom. I also tend to use whatever kind of onions I happen to have around, which can be yellow, sweet, Vidalia or red. Once the soup is blended it is also easy to add small soup sized pasta to add some extra nutrition and bulk to this soup. I love adding about ¼ cup of orzo or stelline pasta. Heads up, you may have to add a little extra stock or water if you add pasta. I love making this version of tomato soup because I know that it has so much more nutrition than a can of condensed soup (and it has less salt). I also love that I can get my husband to eat his one! ☺

Toothless_SignatureJaime

Olive Garden style Pasta Fagioli

Pasta_Fagioli

Everybody loves to eat out at restaurants. It is always fun when you can find recipes for your favorite chain restaurant staples. Plus, it’s so much less expensive to make your favorites at home, not to mention you can tweak the recipe and make it exactly the way you want it. I love these type of recipes because at home, I have complete control over what I put in a dish, and there is no dealing with special orders or seeing if the restaurant kitchen can even alter a dish to be say dairy free. With no teeth, I also find at home I have complete control over how well done or crispy items get, which is necessary in my life without teeth. I have found lots of my restaurant favorites are fairly easy to find online. The great tool that is Google makes it very easy to find recipes for lots of homemade versions of these yummy staples. One of my absolute chain favorites is the Pasta Fagioli soup at Olive Garden (when I can get it without cheese). This was a very easy recipe to find on Google. There were tons of different versions. This is my version that came from several different web variations that I have tweaked to be dairy free, celery free and heavy on the pasta (because that is my favorite part). With lots of practice making this soup, I have also gotten pretty good a making it easy to eat without teeth and most importantly without a blender!

2 lbs ground beef
12 oz chopped onion
14 oz slivered carrots
14 oz diced celery
48 oz diced or crushed tomatoes
1 14.5 oz can red kidney beans
1 14.5 oz can white kidney beans
88 oz beef stock (or you can blend beef and veggie stock)
3 tsp dried oregano
2 ½ tsp cracked black pepper
5 tsp chopped parsley
1 ½ tsp Tabasco sauce (Optional)
48 oz jarred spaghetti sauce
8 oz dry ditalini pasta

Start by browning the ground beef in a large soup pot (if you make this whole recipe you will need at least a 7 quart soup pot, an 8 quart pot if you like to use more liquid for a brothier soup). I usually drain the excess beef fat before proceeding. Add the chopped carrots, celery and onions and cook until they start to soften, about 10 minutes (I cook them for a lot longer until they are really soft and tongue squishable). Add in the tomatoes and the beans and mix well. Stir in the beef stock and the oregano, pepper and parsley. Bring the pot to a simmer and add the Tabasco if desired as well as the jarred spaghetti sauce (I like using a garlicy Prego) and the dry pasta (any small shaped pasta will work well here). Keep the soup at a low simmer and cook (stirring often) until the pasta and the veggies are tender, usually about 45 minutes. Serve with parmesan cheese for those who want to add it as well as garlic bread or breadsticks (I just use a little margarine and garlic salt on whatever bread we have or I use canned breadsticks). You can also add fried onion strings on top to give the soup a little crunch (I pass on the crunchyness).

This soup is so close to the Pasta Fagioli at Olive Garden and I love the ability to alter this delicious one pot dinner. I usually skip the Tabasco because it bothers my mouth, my husband will add a ton of Tabasco to his bowl anyways ☺ I also skip the celery since I am mildly allergic to it and picking the little pieces out of the soup later is annoying. I use a little more of the carrots and onions to make up for skipping the celery. I have also figured out that it helps to shred the carrots in the food processor and to dice the onion as fine as possible. This helps to get the veggies to cook so they are tender enough that I can gum them easily. A little warning, this recipe makes a ton of soup. My husband and I almost always halve the recipe for fear of having soup for weeks. We have tried freezing this soup and it does work great, and it’s super easy to reheat and use as a quick meal at a later date. If you halve the recipe we have also found that the unused half cans of beans freeze well in a ziplock bag for the next time. A general caution, the pasta will inhale and absorb lots of the broth, so if you like a brothier soup, be prepared to throw in an extra can of beef stock. If you happen to have fresh parsley, it is super yummy here and it makes a pretty garnish. And lastly, I am not a huge bean fan as they are a little tough to eat with no teeth. Occasionally I skip the beans all together and simply use 1.5 times the pasta. I would love to hear of other variations or add-ins that go well with this recipe. Please try this out, then share your variations here!

Toothless_SignatureJaime

Carbonara-Style Pasta

Asparagus_Carbonara

Carbonara-style Tagliatelle with Asparagus and Lemon-Herb Breadcrumbs

When I found this recipe I was super excited. Not only was it very easy to make this pasta dish dairy free (just skip the cheese), but it is a great recipe when I am in a hurry and just want a quick dinner. It is also very easy to make this dish soft enough that I don’t have to chew it a ton. I have used leftover asparagus and several different leftover proteins in this dish and it is always yummy (the photo above included left over ham steak and whole wheat fettuccine). I found this recipe on Foodnetwork.com and I have made it so many times, it has never been the same twice, but it’s always yummy!!

So here is the basic recipe:

1 pound asparagus, trimmed and washed
4 T extra virgin olive oil (plus extra to drizzle on the top)
Kosher salt
2 T butter or margarine
Grated lemon zest (2 lemons)
1 cup breadcrumbs
¼ cup finely chopped fresh chives
¼ cup finely chopped flat-leaf parsley
1/3 pound pancetta, chopped
1 tsp black pepper
4 cloves of garlic, grated
½ cup dry white wine
3 egg yolks
1 pound egg tagliatelle pasta (or any pasta shape)
1 cup grated pecorino cheese

Trim the rough ends off of the asparagus and lightly drizzle with olive oil. Grill the asparagus until lightly charred and tender, about 7 to 10 minutes. Cut into 1-inch pieces on an angle. Heat a large pot of salted water to boiling. In a small skillet, heat 1 T of olive oil over medium heat. Add the butter and heat until melted, then add in the lemon zest and breadcrumbs. Stir until moistened and golden brown. Then add in the chives and parsley and take the skillet off the heat. Heat the remaining three tablespoons of olive oil in a large skillet over medium heat. Add the pancetta and the pepper and cook for three minutes, stirring well. Add the garlic and cook while stirring for another 2 minutes. Deglaze the pan with the wine and turn the heat down to low. Lightly beat the egg yolks in a small bowl. Cook the pasta in the boiling water until al-dente (or until soft if you are toothless like me). Save 1 cup of the cooking liquid and drain the pasta. Beat the reserved water into the egg yolks to temper them. Add the asparagus to the pancetta mixture and heat through. Mix the pasta into the skillet with the asparagus and the pancetta mixture. With the heat off, pour the egg mixture over the top of the pasta mixture and toss for a minute or two. Here is where you add in the cheese if you like, I omit the cheese and simply put it on the table for those who want it. Put the pasta in a serving dish and coat with the lemon breadcrumbs, drizzle with a little extra-virgin olive oil if desired and serve.

The thing that I love most about this dish is that I tend to make it to use leftovers and it makes for a super fresh twist every time. I have used leftover asparagus many times. I have also served this with leftover parmesan crusted chicken for my husband to take for lunch. When I have leftover pork chops or ground pork and veal meatballs or leftover ham or ham steaks I love to add them into this recipe. When I have the last bit of a loaf of bread that is getting hard, I like to make my own breadcrumbs that I can use here. I have also made a small batch of this recipe when I have left over pasta that I need to use, any crazy shaped pasta will work. So try this recipe out, then try diggin’ in your fridge to see what you can add to enhance this in your own way!

Toothless_SignatureJaime

Dairy/Gluten Free Peanut Bars

CornFlake_Bars

When I was younger, finding really great desserts that were dairy free was always a challenge. We found a recipe for corn flake peanut butter bars that was awesome! This recipe is great because it is dairy free if you want it to be, but you can also add chocolate to these bars for those without allergies. This was always our go to recipe for when we were taking treats to school, Girl Scouts, church events and play dates. These peanut butter bars were always a big hit, whether they had chocolate chips, caramel chips, peanut butter chips or if they were plain. I also realized later these are gluten free depending on what brands of ingredients you use. These do have peanuts (lots of them!) so they are definitely not for those with peanut allergies.

1 cup light corn syrup
1 cup brown sugar
1 cup peanut butter
1cup peanuts (optional)
6 cups corn flakes

Optional:
6 oz chocolate or other type of chips
1 Tbsp veggie oil

Using a microwave safe glass bowl, combine the corn syrup and brown sugar. Heat in the microwave for 4-5 minutes until melted and boiling (you want the sugar to melt so the sauce is not gritty). Stir in the peanut butter until well mixed. Pour the liquid mixture into a large bowl with the corn flakes and peanuts. Mix to coat the cereal well. Press mixture into a well-greased 8×12 inch glass baking dish (this is a great job for little hands ☺). In a separate microwave safe bowl, combine the chocolate chips with the vegetable oil. Microwave for 1-2 minutes until the chips are melted and completely smooth. Spoon the chocolate mixture over the corn flake bars forming a nice even coating. Refrigerate for at least one hour until chocolate has set. Then slice bars to desired size. Store bars in a cool (refrigerated) place.

In our house we always halved the amount of chocolate chips and only coated half of the bars with chocolate so I could eat the plain half. Occasionally you can find dairy free “chocolate” chips and feel free to use these if you like. I did figure out recently that I could use carob chips in this recipe and they are quite tasty (but they can be hard to find and don’t melt as smoothly). You could also use nice dark chocolate bars for the topping if you are a dark chocolate lover. I also have recently started making these without the peanuts as I no longer enjoy the crunchy nuts because they are hard to chew (without teeth). I think my favorite thing about this recipe is that it is super easy and kiddo friendly if you have young ones who like to help in the kitchen. You can also put the mixture in greased muffin tins to make individual little bars. By putting out candies and other toppings these can be fun at a kiddo birthday party activity where everybody can decorate their own treat! Once they are chilled you can also use cookie cutters on these to make fun shapes. So try these out, then see what variations you can create and share them here!!

Toothless_SignatureJaime